Posted on Categories Conventions, CosplayTags , , , , , , 2 Comments

DragonCon 2013 Wrap up Pt. 1 — She-Ra

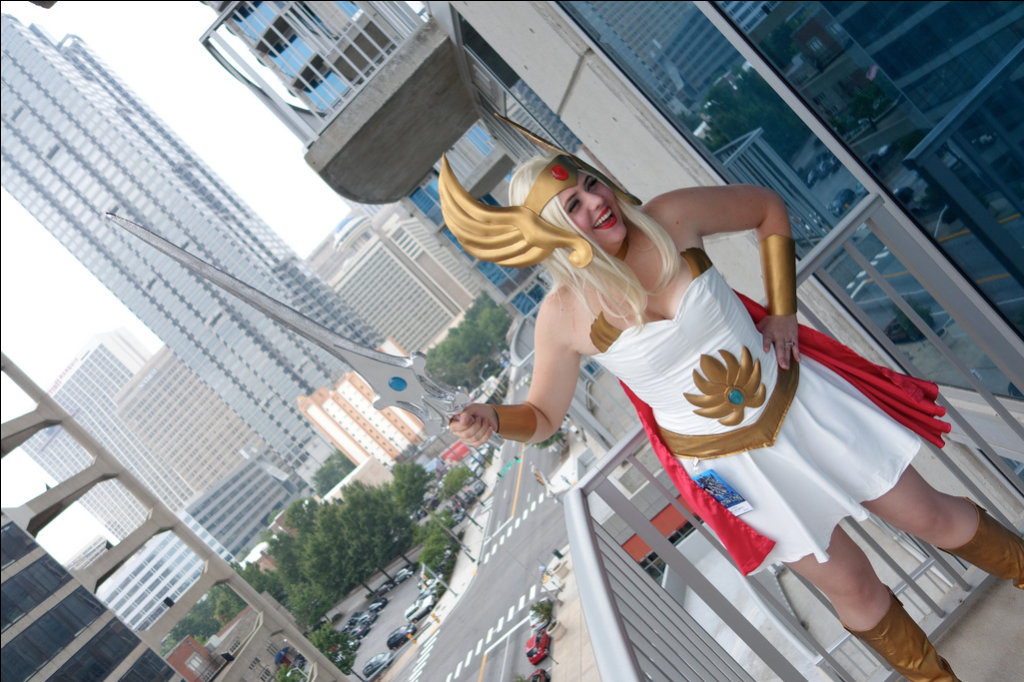
Now that the craziness of DragonCon is over, and I have a few minutes to breathe, I wanted to share a little bit about my She-Ra costume with you all.

Shera

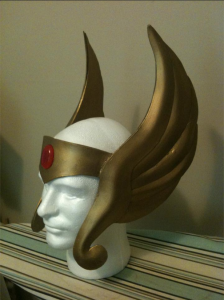
She-ra was a big step forward for me in cosplay/costuming standards. This one the first time I really did anything with craft foam, sculpting or otherwise (not counting, of course, my Medusa belt buckle from 2 years ago which was fabric covered foam). I did some crazy research and learned about molding EVA craft foam with heat. I used craft foam for the bracers (aka Wristie-cuffs), the head piece, and the fern on the front.

*note: all process photos I took this year were quick snap shots with my phone, usually at night time, so the color isn’t great

I started with hand drawing the headpiece shape, paying close attention to the proportion of the head piece to her face. I then cut a solid back piece, then the individual fern pieces about 1/8 inch larger than I drew so I hand some room when I heated it up and molded it to give it the 3-d shape. I kinda eyed the shape I wanted and pinched the warm foam until it cooled. Then I glued it all together with E-6000. I used the same process for the front fern, except I scaled it in illustrator since the shapes are a little more complex.

I noticed a lot of people online secured the headpiece with clips. This didn’t seem like it would be stable enough for me and a wig, so I used a bra back and some elastic to hold it on my head. Some crafty engineering on my part. The jewels are resin, and I painted the back with nail polish vs dye in the resin (for the sword resin jewels I actually used some leftover blue Duplicolor Metal cast from painting my Captain America shield, and that game me a more consistent color on the back).

You have to be careful with EVA foam, because it can melt with the wrong products attached. Getting the gold patina involved a series of PVA (Elmber’s Glue) Mop n’ Glow and Rub n’ Buff.

The finished headpiece

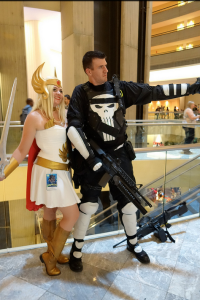
It took forever to find the right fabric for this costume, but I ended up find a poly-blend stretch fabric on discount that had a lovely almost waxed surface that reminded me a bit of leather. It had lovely drape, and that was used on the skirt and the corset cover. The skirt is a 3/4 circle skirt, drafted myself with some residual math knowledge and the internet. If I were to do this again, I would do the corset top differently to eliminate some of the wrinkling when pulled tight. Knit is a fickle mistress. But the corset base is cotton duck fabric with a 100% cotton lining to absorb sweat and is spiral steel boned.. The gold trim is white pleather covered in Rub n Buff. Next time I think I’d  use real leather for this or Heat Vinyl transfers since for some reason the Rub n Buff didn’t want to stick. The fern body piece and “boob wings” are glued directly to the corset.


Screen shot 2013-09-11 at 12.30.04 PM


You can’t see them in the first picture, but the boots are also covered in Rub n Buff, but they did not have the flaking issue the pleater did. Go Figure.

If anyone is interested in learning more about the costume or would like some tutorials on any specific parts, just let me know in the comments section!

Posted on Categories CosplayLeave a comment

How do you set up/organize your cosplay and sewing space?

I was reading on cosplay.com and came across this thread about organizing your cosplay/ sewing space.

To be totally honest, right now I need to clean up and organize after our DragonCon trip, but I thought I’d try to answer the following questions, in the event it’s helpful for anyone else. I’m planning on re-organizing my space this weekend so if things change, I’ll update the following.

And if you have any tips, tricks, or ideas, add them in the comments!

If you sew for other things besides cosplay, how does the cosplay work into your sewing room? 

I normally sew fashion garments for myself but I can tell that I need to adjust my room to accompany both. I also use my room for drawing. I have a desk (soon to be drawing table) in the closet and try to use that space for art since drawing tends to take up less space than the explosion that is sewing.

Right now I have several bookshelves full of fabric, organized by type of fabric, and one bookshelf of reference books. I have a small chest of drawers for sewing notion (zippers, elastics, trim), and the top shelf of the closet has bins. Those are organized by:

  • Tapes and glues
  • markers
  • pencils
  • inks and pens
  • fabric and acrylic paint
  • watercolor
  • printing and framing supplies
  • grommets and corsetry supplies

I also have a set of plastic drawers for patterns, and a file folder box with custom patterns, slopers, and altered patterns.

And random cardboard boxes full of things.


Is your space all over the house or do you have a specialized sewing room? 

I have a dedicated room I’m supposed to stay in.

Does your sewing room “travel”? 

Right now, it’s spread all over the house like the chaos butterfly I am. I tend to take things with me, as the scatterbrained multi-tasker I am. Also, I work with limited space in my office, and my work table is dedicated to the sewing machine and serger that live on it. If I need to cut fabric or something on a self-healing mat, I need the dining room table. If I want to hang out with my husband and do hand work while watching tv, it travels with me to the den.
How do you manage remnants and things you bought for specific projects? 

I have bags and boxes full of them. I’m supposed to go through them annually but it’s hard because you never know when you’ll need a little bit of a specific fabric.
Do you ever throw things away?

When I’m forced to.
Do you use wall-space? Under-the-bed space? Closet space?

I tend to put everything in boxes or in piles. I mostly use bookshelves and the limited space in my closet… or the shed in the backyard for things like spray paint or power tools.
How do you store your machine? How many machines do you have?

I leave my machines out all the time, I have two (normal sewing machine and a serger). I try to keep a dust cover on them, but they get a decent amount of use.
Do you use other people’s sewing space? Do you share a sewing space?

Nope! I share a house with my husband, so sometimes when our hobbies travel, we have to share things like the dining room table.
Do you keep your sewing space neat or are things tossed about?

It always looks in disarray.
How much do you invest into organizing your sewing space?

I bought a bunch of bins a few years ago. I think I spent around $50 on them. I’d like to put in some built-in bookshelves in this alcove I have, but don’t yet have the time or money to invest in it, when the $20 MDF bookshelf from target works for now.
Do you re-organize often?

I try to give it a good clean/organization once a year, but I really should do it more. A good deep clean/ organization weekend lasts me around 2 weeks before it’s crazy again.

Posted on Categories SeriesTags , , , , , , , , , , , Leave a comment

Evaluating your closet

I’ve been meaning to post this for awhile, but with planning a wedding freaking me out, wardrobe building has taken a back burner.  So without further ado…

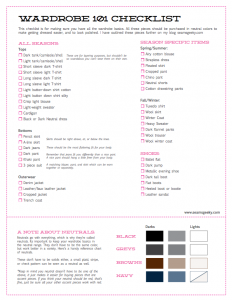
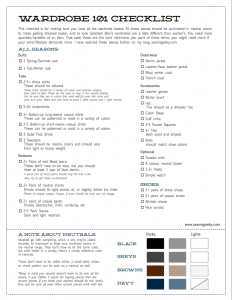
After reading article after article I’ve put together a basic wardrobe checklist. Huzzah!

Without a huge long intro, you can download these checklists here:

Women's Wardrobe Checklist
Men's Wardrobe Checklist


Cleaning out one’s closet can be a daunting task, but before we build our wardrobe, we need to see how much of our wardrobe we actually have already. So often we have clothes in our closet that are perfect basics, we just don’t think of them that way. I think it’s really easy to think of everything in your closet as a statement piece that speaks mounds about who you are, where in reality we have all the basics we need hidden in plain sight.

I’ve included a key to neutrals on the bottom of the checklist. I refer a lot to “Dark, Mid-tone, and light neutrals” because if someone looks awful in black, you shouldn’t buy black things because it’s on a checklist. A “little black dress” can just as easily be a dark grey, brown, or navy. If you’re not sure what colors work best on you, drape different colors of fabric near your face and look at yourself int he mirror. Some colors will drain color from your face while others will make you glow.

I also want to mention that a neutral for your wardrobe doesn’t need to be black, grey, brown, or navy. You can have red be a neutral, you just have to be careful that everything else you buy or make will work with red.

1

How to use your wardrobe checklist:
So with checklist in hand I ripped open my closet doors and started evaluating all the pieces of clothing in my closet. I pulled out each piece and evaluated it on the criteria:

  • Do I like it?
  • Does it fit?
  • Is this on my checklist?

If I like it, I try it on (unless I know it already fits) and evaluate the fit. After you try it on, look long and hard at yourself in the mirror. I like to stand back and squint my eyes. Turn around and evaluate different angles, then ask my lovely soon-to-be husband how it looks if I can’t decide.

A few tips for trying on clothes:

  • If it looks a little strange and you’re not sure if you like it or not, play with the hem. Sometimes taking a hem up or letting it out slightly can make a so-so skirt, dress, or pant look amazing on you.
  • Try on a pair of shoes you would wear with the outfit you’ve tried on. You might find out that those frump slacks look amazing when you throw on a pair of heels with them.

Trying on clothes and evaluating them like this will also give you an idea of what shapes flatter you, helping you pick out clothes in future. Pretty nifty!

Next, I compare it to my checklist. I then place it in 1 of 5 piles: 

I then organized my closet by type of garment and color so I can easily find items to wear. I put all items living in The Land of Ill-Fitting Clothes in a separate box which is labeled. I don’t want any clothes that aren’t wearable in my closet to distract and frustrate me.

Something worth mentioning:
A wardrobe basic that needs altering should not be crossed off your checklist until it is altered. You want your checklist to reflect what items you can actually wear now. This is the same for items living in the Land of Ill-fitting Clothes.

After going through my closet I realized I only had about 5 items on the checklist. I was shocked because I thought I’d have a lot more. But now, I am armed with items I need to make or find!
Stay Geeky

–Laurel

If you have any questions or comments about the checklists, just leave them in my comments. I’ll answer them the best I can.

Posted on Categories UncategorizedTags , , , 2 Comments

Where I Talk about the Wonderful World of ComiCostuming

Awhile back I nervously did a talk about Cosplay at Ignite Memphis. I thought I’d share the video for all who couldn’t be there:

Fun Fact:

  • I was still riding my Dragon*Con high when I submitted the idea, and was super sure I was going to vomit all over the stage.
Posted on Categories SeriesTags , , , , , Leave a comment

Defining your Style


Can you define your style in a sentence or less?

I tried to define my current style in a sentence, and then I realized that I couldn’t. I couldn’t even define what I wanted my personal style to be.  All I could think of was “frumpy” and “t-shirt and jeans.” This may have worked in my early 20s, but now that I’m a grown up in a professional environment, this isn’t exactly a look I wanted to be identified with who I was.

Considering I’m an Art Director by day, I decided to approach my personal style in the same way I approach a problem for a client, with inspiration and brain storming.

How to define your personal style:
First thing to do is to find pictures and colors that move you and put them together in one place.

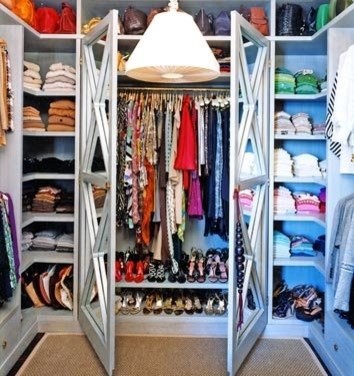
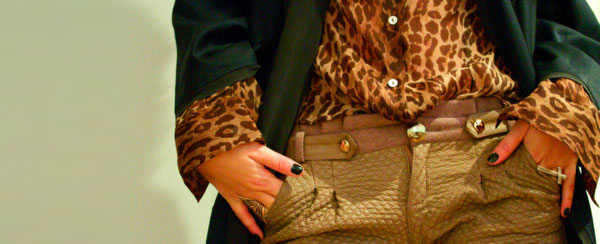
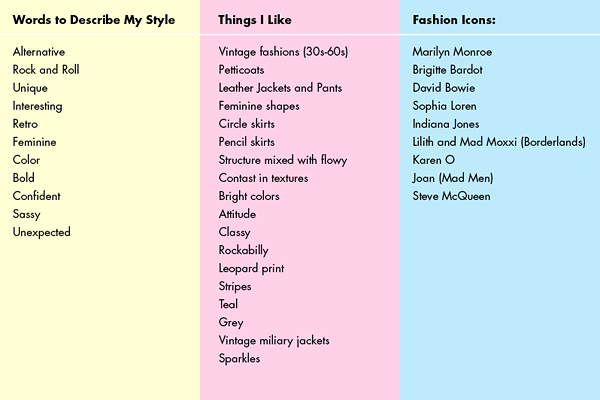
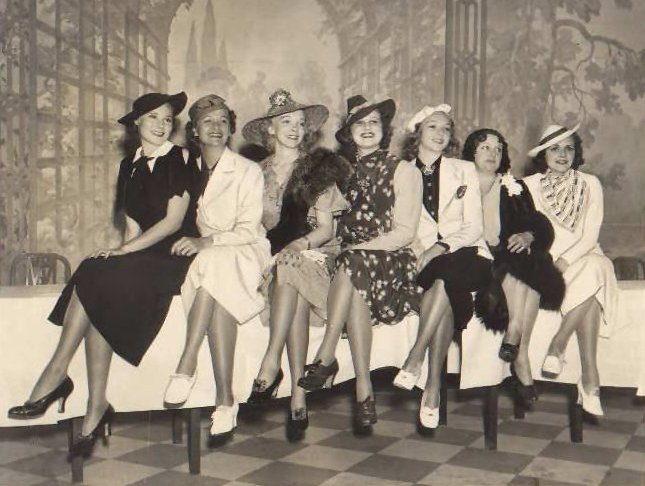
I used my Pinterest account and set up a board to collect my inspiration. I grabbed colors, styles, and people whose style I admire. I tried to really go with my gut, and grab things that spoke to me. I didn’t want to think, I wanted to just grab. I figured I could just sort it out later, and hope to find some sort of theme.

Things I learned:

So putting this all this knowledge together, what is my style?

I’m tentatively defining it as (drum roll please):

Sassy Femininity

I wanted to define my style as lively, bold, cheeky, spirited and embracing womanly shapes and textures. This definition allows me to easily pair urban and edgy styles that are bold and attention getting, while still having womanly shapes like fashions from the 40’s, 50’s and early 60’s.

You don’t want to limit your style by your definition, but you want it to be an easy mortar you can think of when you decide what styles to wear. And remember, style is about looking and feeling good in the clothes you wear, so if you don’t think you’ll feel comfortable or confident in don’t put it on your style boards. For example, I don’t feel comfortable or confident in shorts, so they don’t take a lot of prominence on my style board.

I suggest printing out or making a collage of images from your Pinterest board for inspiration, sorting the items  according to what drew you to them, and how they reflect your defined style. If you are super anal, you can put it in a notebook you take shopping, put it on your wall as a reminder to the look you want to develop for yourself, or just leave it on the internet for reference.

For my male readers:
For my whole “Wardrobe 101” feature I’ll include a section which target’s a man’s wardrobe. For this post, keep in mind that the process is the same for a man and a woman. Finding inspiration may be a little harder to come by, so I suggest finding characters in media that you are drawn to. What are they wearing? Do you like how they dress? Their attitude?
I started a Pinterest board for my fiance where we’ve started collecting fashion inspiration for him as well. I’m sort of forcing him along this journey with me.

If you have other ideas for defining your style, want to share your style board on Pinterest, or just want to post your style definition, I would love to read it! Just leave it in the comments or let me know on twitter. I really want to make this wardrobe series something that a group of us can go through at the same time, either like a small community or a support group.

Next week: What makes a good wardrobe

Posted on Categories SeriesTags , Leave a comment

Wardrobe Theory


I never have anything to wear.

Seriously.

And I’m quickly finding out that, as an almost 28 year old, I still dress like I’m 15. Probably even worse, because I use to dressed pretty cute at 15. I attribute this to several factors.

1- I’ve gained weight. I don’t want to admit it, but I realized that slowly over the past few years more and more of my clothes got banished to the land of ill-fitting clothes.
2- I’m lazy. I’m lazier now also for several factors, one I blame on my hair (I’ve been growing it out for my wedding, and it’s so long, i don’t know what to do with it) and the other is my extreme love of cuddles.
3- I Stopped paying attention to fashion trends. I just zoned out on fashion. As soon as skinny jeans hit the scene 3 or 4 years ago, I tuned out. Also, with weight gain, you tend to hate shopping.

So I checked a bunch of books out of the library about “defining your style” and “How to always dress your best.” I learned it all came down to the same thing, defining your basic wardrobe. This got me thinking about my wardrobe, or least what was left in the wearable pile. I knew I had to change it up, and stop sewing fun pieces that don’t go with anything, and start making sure I can make outfits.

I’m sure I’m not the only one with this problem, and I’m at a point where I’m ready to dress like an adult. Considering you can’t nominate yourself for “What Not To Wear,” I’m taking matters into my own hands. I encourage anyone else who feels this way to join me. You don’t sew? That’s ok! Just go out and find items that fall into the basic wardrobe category.

For all of 2012 I’ll be focusing on creating a wardrobe that works.

A few things I’ll cover in this on-going wardrobe series:

  • What makes a good wardrobe
  • Defining your style
  • Organizing you closet
  • Planning a wardrobe
  • Undercover: learning the basics of undergarments
  • Making (or buying) great clothes that fit

It should be a lot of fun! I hope you join me.

Stay Geeky

–Laurel

Posted on Categories UncategorizedTags , , , Leave a comment

Puttin’ On the Ritz

Just a quick post to show off Mine and Zach’s costumes from my work’s 1920s themed holiday party.

I realized I ended up making both our costumes because Zach had ended up wearing pirate pants from his Science Pirate costume from a few Halloweens back. I worked really hard on this dress, and am so sad we didn’t take a full length picture! Luckily we have these because of the photobooth they set up at the party. I’ll be sure to showcase the outfit in it’s full glory (and color) soon. Along with my griping about how awful 1920s fashion is. I’ll admit it now, it’s mostly because I can’t wear it.

Toodles

Posted on Categories UncategorizedLeave a comment

A rather rough start

A very short introduction:

I decided after slaving over costumes for the 2011 Dragon*con, I was going to start a blog about making cosplay costumes and just geeking out of sewing.

As all good plans, they get waylaid by silly things like getting in shape.

I went with a bunch of friends to Dragon*con this year in September, and by the beginning of October, My fiancé and I decided to get fit via P90X. I’m sure I’ll elaborate on this much later, once we complete the program at the end of the year. Because of all the rapid body changes you go through (I lost an inch around my waist int he first month!) I swore off all sewing until we become “P90X Graduates.” This can make a sewing blog look like a ghost town.

But I have some exciting ideas for 2012, and a dress form in the mail as a birthday present, so I’m sure we’ll get off to a good start soon enough.

Until then, some things to look forward to:

  • I plan on doing a few sew-a-longs including (but not limited to) a corset and a blazer
  • Creating a wardrobe that works with your style
  • I’ve got some great costume ideas for 2012, and I’ll work them step by step with you
  • Recreating retro looks
  • Organizing my sewing room (that’s more for me)

I have a lot more planned, but we’ll start there.

Stay geeky!