Posted on Categories Commissions11 Comments

New X-Men Hoodie Kinda-Commission

20130924_213809

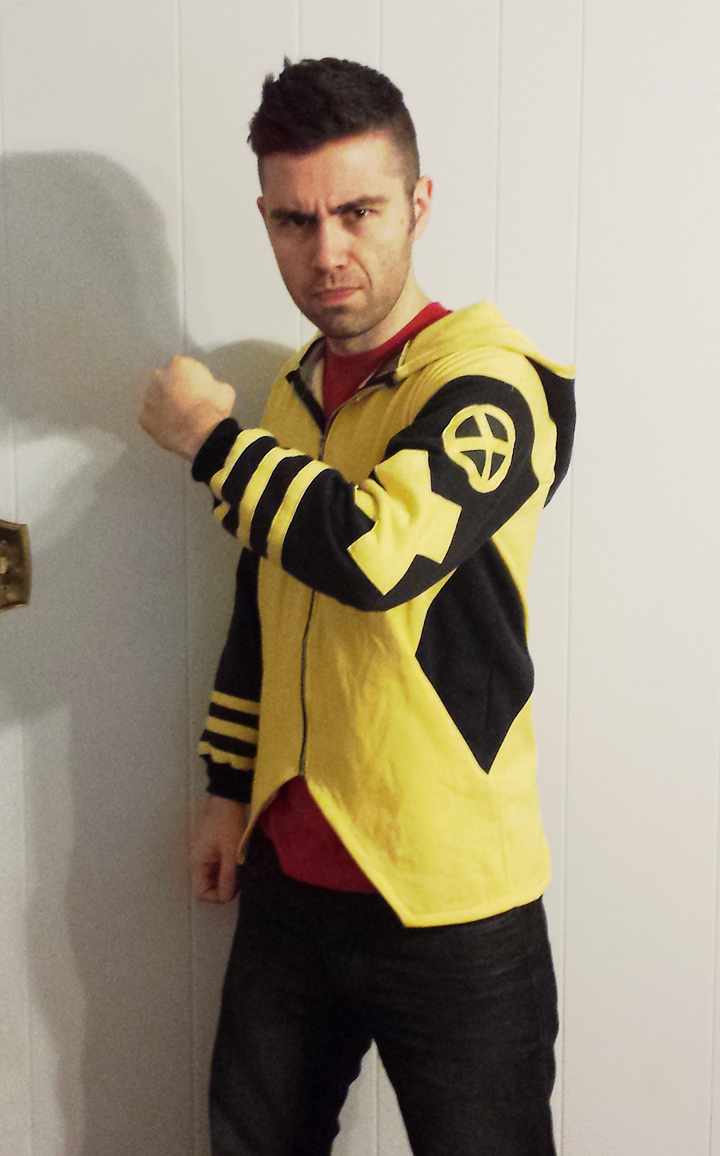
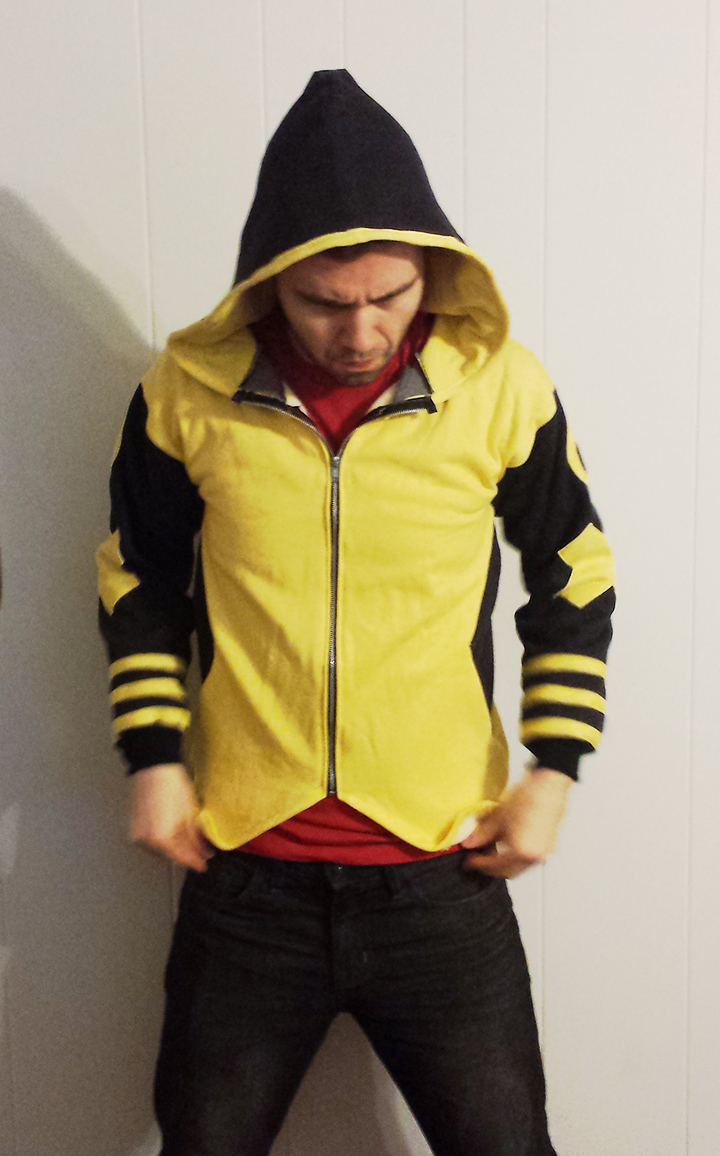
I call this a Kinda-Commission because a friend of mine (The oh-so-talented Chris Haley) was wanting a hoodie similar to Cyclops’ jacket in New X-Men.


We’d talked about design, color, functionality changes that occur when you are essentially taking a leather biker-jacket and combining it with a letterman jacket and turning it into a different kind of jacket, in a different material. We’d priced out the cost, and then I realize that Chris’ birthday is coming up, and I could surprise him with the hoodie. The challenge being I didn’t have his measurements and had to go about guessing his size (a wonderful thank you to his lovely girlfriend, and an old Mister Miracle t-shirt he gave me two years ago).

20130924_213749

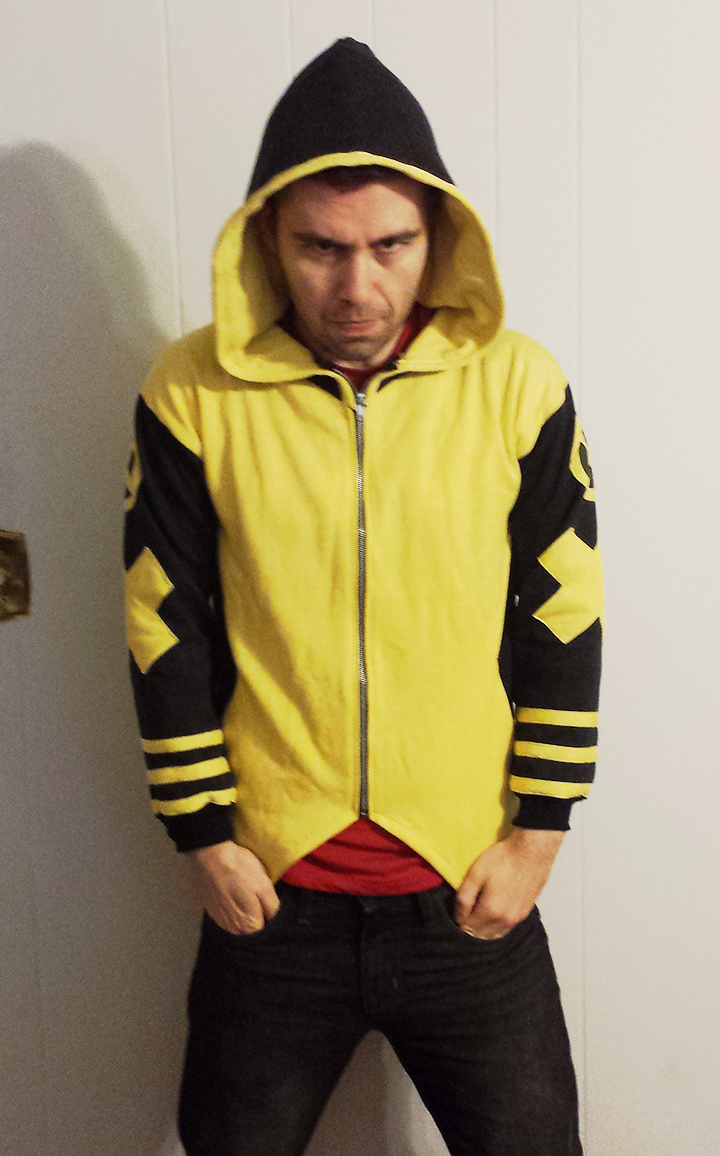
Hoodies are longer than a jacket and Chris also has a longer torso so alterations needed to me made. And with making a jacket-of-sorts longer, you also need to redraft the “X” to have proportionate angles. I did quite a bit of research for this, pulling out my husband’s New X-Men books to try to figure out all the angles on the jacket to make sure I got what I could correct.

Side note: I’ve boycotted X-Men and specifically this series because of my unnatural attachment and devotion to Jean Grey. While researching this stuff I caught a few panels and cried like crazy. Afterwards I asked my husband if I should break down and read it. He responded with “It’s such a good series, but no. It wouldn’t good for you emotionally.”

Well, went I went to one of local chain fabric stores they didn’t exactly have the colors I needed (they didn’t have black. But they did have dark grey), so RIT dye to the rescue! I started out with a dark grey and a white fabric, pre-shrunk in the washer.

20130924_213822

I learned a lot while dying my fabric for my Captain America costume, one major point being if you want vibrant colors, it doesn’t matter how much dye you put in, you need very hot water to keep the fabric fibers open. I now achieve this with constant heat and a large 3 gallon pot on the stove. This has other limitations, like not being as large I need. For this, I cut the pieces out first, then dyed them individually. I find I can get a more consistent dye on the pieces than dying a large piece of fabric, and I don’t stain my washing machine. (I’m hoping in the future my husband and I can figure out a way to get me my own personal washing machine just for dying, but until then I make do).

20130924_213753
The X-Men school logo patches I made the good ol fashioned “Freezer paper” method. I still owe him an “x” zipper pull, since the one I sculpted split in half when trying to insert the jump ring. I was so afraid it wouldn’t fit, but it does. Pretty perfectly. Lookin’ sharp, Chris.

If he asks nicely, I might try to make him a Cyclops visor to go with it.

Posted on Categories Conventions, CosplayTags , , , , , , 2 Comments

DragonCon 2013 Wrap up Pt. 1 — She-Ra

Now that the craziness of DragonCon is over, and I have a few minutes to breathe, I wanted to share a little bit about my She-Ra costume with you all.

Shera

She-ra was a big step forward for me in cosplay/costuming standards. This one the first time I really did anything with craft foam, sculpting or otherwise (not counting, of course, my Medusa belt buckle from 2 years ago which was fabric covered foam). I did some crazy research and learned about molding EVA craft foam with heat. I used craft foam for the bracers (aka Wristie-cuffs), the head piece, and the fern on the front.

*note: all process photos I took this year were quick snap shots with my phone, usually at night time, so the color isn’t great

I started with hand drawing the headpiece shape, paying close attention to the proportion of the head piece to her face. I then cut a solid back piece, then the individual fern pieces about 1/8 inch larger than I drew so I hand some room when I heated it up and molded it to give it the 3-d shape. I kinda eyed the shape I wanted and pinched the warm foam until it cooled. Then I glued it all together with E-6000. I used the same process for the front fern, except I scaled it in illustrator since the shapes are a little more complex.

I noticed a lot of people online secured the headpiece with clips. This didn’t seem like it would be stable enough for me and a wig, so I used a bra back and some elastic to hold it on my head. Some crafty engineering on my part. The jewels are resin, and I painted the back with nail polish vs dye in the resin (for the sword resin jewels I actually used some leftover blue Duplicolor Metal cast from painting my Captain America shield, and that game me a more consistent color on the back).

You have to be careful with EVA foam, because it can melt with the wrong products attached. Getting the gold patina involved a series of PVA (Elmber’s Glue) Mop n’ Glow and Rub n’ Buff.

The finished headpiece

It took forever to find the right fabric for this costume, but I ended up find a poly-blend stretch fabric on discount that had a lovely almost waxed surface that reminded me a bit of leather. It had lovely drape, and that was used on the skirt and the corset cover. The skirt is a 3/4 circle skirt, drafted myself with some residual math knowledge and the internet. If I were to do this again, I would do the corset top differently to eliminate some of the wrinkling when pulled tight. Knit is a fickle mistress. But the corset base is cotton duck fabric with a 100% cotton lining to absorb sweat and is spiral steel boned.. The gold trim is white pleather covered in Rub n Buff. Next time I think I’d  use real leather for this or Heat Vinyl transfers since for some reason the Rub n Buff didn’t want to stick. The fern body piece and “boob wings” are glued directly to the corset.


Screen shot 2013-09-11 at 12.30.04 PM


You can’t see them in the first picture, but the boots are also covered in Rub n Buff, but they did not have the flaking issue the pleater did. Go Figure.

If anyone is interested in learning more about the costume or would like some tutorials on any specific parts, just let me know in the comments section!

Posted on Categories CosplayLeave a comment

How do you set up/organize your cosplay and sewing space?

I was reading on cosplay.com and came across this thread about organizing your cosplay/ sewing space.

To be totally honest, right now I need to clean up and organize after our DragonCon trip, but I thought I’d try to answer the following questions, in the event it’s helpful for anyone else. I’m planning on re-organizing my space this weekend so if things change, I’ll update the following.

And if you have any tips, tricks, or ideas, add them in the comments!

If you sew for other things besides cosplay, how does the cosplay work into your sewing room? 

I normally sew fashion garments for myself but I can tell that I need to adjust my room to accompany both. I also use my room for drawing. I have a desk (soon to be drawing table) in the closet and try to use that space for art since drawing tends to take up less space than the explosion that is sewing.

Right now I have several bookshelves full of fabric, organized by type of fabric, and one bookshelf of reference books. I have a small chest of drawers for sewing notion (zippers, elastics, trim), and the top shelf of the closet has bins. Those are organized by:

  • Tapes and glues
  • markers
  • pencils
  • inks and pens
  • fabric and acrylic paint
  • watercolor
  • printing and framing supplies
  • grommets and corsetry supplies

I also have a set of plastic drawers for patterns, and a file folder box with custom patterns, slopers, and altered patterns.

And random cardboard boxes full of things.


Is your space all over the house or do you have a specialized sewing room? 

I have a dedicated room I’m supposed to stay in.

Does your sewing room “travel”? 

Right now, it’s spread all over the house like the chaos butterfly I am. I tend to take things with me, as the scatterbrained multi-tasker I am. Also, I work with limited space in my office, and my work table is dedicated to the sewing machine and serger that live on it. If I need to cut fabric or something on a self-healing mat, I need the dining room table. If I want to hang out with my husband and do hand work while watching tv, it travels with me to the den.
How do you manage remnants and things you bought for specific projects? 

I have bags and boxes full of them. I’m supposed to go through them annually but it’s hard because you never know when you’ll need a little bit of a specific fabric.
Do you ever throw things away?

When I’m forced to.
Do you use wall-space? Under-the-bed space? Closet space?

I tend to put everything in boxes or in piles. I mostly use bookshelves and the limited space in my closet… or the shed in the backyard for things like spray paint or power tools.
How do you store your machine? How many machines do you have?

I leave my machines out all the time, I have two (normal sewing machine and a serger). I try to keep a dust cover on them, but they get a decent amount of use.
Do you use other people’s sewing space? Do you share a sewing space?

Nope! I share a house with my husband, so sometimes when our hobbies travel, we have to share things like the dining room table.
Do you keep your sewing space neat or are things tossed about?

It always looks in disarray.
How much do you invest into organizing your sewing space?

I bought a bunch of bins a few years ago. I think I spent around $50 on them. I’d like to put in some built-in bookshelves in this alcove I have, but don’t yet have the time or money to invest in it, when the $20 MDF bookshelf from target works for now.
Do you re-organize often?

I try to give it a good clean/organization once a year, but I really should do it more. A good deep clean/ organization weekend lasts me around 2 weeks before it’s crazy again.