Posted on Categories articles, Cosplay, Fashion, Series, TutorialsTags , , , , , , Leave a comment

Picking proper fabric: Fiber content (super sexy OOOOOO)

banner-pt-3

Picking the right fabric can make or break a costume. And I don’t mean screen correct, but I mean quality, weave, texture, pattern, shine. You don’t have to spend a fortune on getting the most accurate fabric possible, but understanding what kinda of fabrics are best to use can take your costume game to a whole new level.

I’m not going to give you a crash course on textiles or how they are sewn. Getting into the specifics of burn tests and fiber content percentages isn’t something you need to know going into your costume planning. Instead I’ll go over a few important points for you to keep in mind, and a few examples of what fabric’s I’d choose for different costumes. Originally this was just going to be one post, but I get really excited about textiles and can ramble (such a nerd about this stuff). So this post is about fiber content, the next one will be about different weaves.

When I first started sewing fiber content was something I never, ever thought about. I never looked at the end of bolts because it didn’t really matter. And when I’m sewing stuff for normal wear, I don’t think about it a whole lot. I’m not a real snooty sewer who is silk charmeuse obsessed, I sew with what I like. But with costumes I’m really anal about what fiber contents I use.

Natural fibers
Natural fibers are my favorite! Mostly because it breathes. If you’ve ever been stuck in a walkway at Dragon*Con you’ll understand the importance of being in a costume that doesn’t retain every drop of sweat.

Cotton: From the humble cotton plant, this is the best fiber ever, in my opinion, It sews well, it presses well, and It also dyes really well. You can also find all kinds of different weaves and weights. But keep in mind, not all cotton is created equal. Some are thick and lovely, while others can wrinkle badly or too lightweight. Price range $-$$$

Wool: Sheered from our cute and cuddly animal friends! From Sheep to alpacas, this bad boy also breathes and dyes well. Downsides include dry-cleaning… and it’s wool which is known for being a bit on the warm side. $$-$$$$

Linen: Are you looking for the best fabric to make your Avatar: The Last Airbender cosplay out of? Use linen. Linen is a plant based fiber from flax. It has a lovely rustic texture, is easily washable, dyeable, and sews well. Downsides include wrinkling, but that kind of adds to the charm, I think. $$-$$$

Silk: Taken from the cute little silk worm’s cocoons. I’m gonna be straight up honest with you on this one, I hardly ever use real silk for cosplay costumes. I think it’s really price prohibitive and can be a pain to work with. It’ll show water drops if your iron leaks, you may or may not have to dry clean it, it can be really slippery depending on the weave, but it’s also really lovely. You can dye and paint silk in amazing ways and get absolutely beautiful color. It feels amazing, and there’s so many different weaves and textures to choose from. It’s also an investment $$$-$$$$

Other natural fibers I don’t use much but are available include Bamboo, soy, hemp. They are basically better cotton and hemp is like a stronger variation of linen. $$-$$$$

Leather: I think we are familiar with leather. It can be luxurious, slightly stretchy (and I mean slightly), easily manipulated, you can dye it, stain it, paint it. But buying leather is a different process since you are buying hides of animal skin, and it’s measured by the square inch. It’s also pricey, and you may or may not have a desire to use animal hides for personal reasons. $$$-$$$$ More information about leather hide measuring and purchasing can be found here.

The middle child, Rayon: I’m having a stupid love affair with Rayon right now. But it’s not technically a natural fiber since it’s man made, but it’s not a synthetic material because it’s made from plant cellulose. It can be stiffer or flowy. It feels wonderful, it can breathe, and it doesn’t have to be stupid expensive. Other terms you may see include viscose, modal and lyocell. $-$$$

Synthetics
Synthetics are great because they are less expensive than natural fibers. And there is basically 2 kinds: Polyester and Nylon The downside is, they aren’t as versatile when it comes to the ability to take dye and they don’t breathe like a natural fiber does. Well, except for one big caveat: super fancy sports manufactured fabrics. Think Under Armour shirts. Those guys are polyester and sometimes nylon mixed but science has made them wickable and breathable. When I need spandex, I look here first. If I can find the color I need with a moisture management spandex I will. And it will make all the difference in the world.

Not all synthetics are stretchy like spandex, but they can be much cheaper than their natural alternatives. But there is a downside, if you aren’t careful you can melt it if ironing it too high, and sometimes it’s hard to get a good press.

And my favorite synthetic: Faux leather/pleather. It’s still pricey, but is no where near as pricey as real leather. It doesn’t have the same texture or share the same richness as real leather, but you can buy it by the bolt, and they make some really nice ones these days.

Tip sparkle rightA note on dying synthetics: They make dye for polyester. There is one called iDye by Jacquard (it will say “for Polyester”) and Rit just came out with a new formulation called Dyemore which I wanted to try, but nowhere local carries it right now. I recently tried iDye and, straight up, those colors are rich and intense (not what I was looking for at the time) and mixing colors can be a bit of a challenge, especially with their “mess free bags” which dissolve when water touches them. Not ideal for measuring it out 1 teaspoon at a time.

Nylon CAN take dye really well (and normally does) or it can be stupid stubborn and won’t take any. It’s a bit of a crap shoot.

Fiber blends
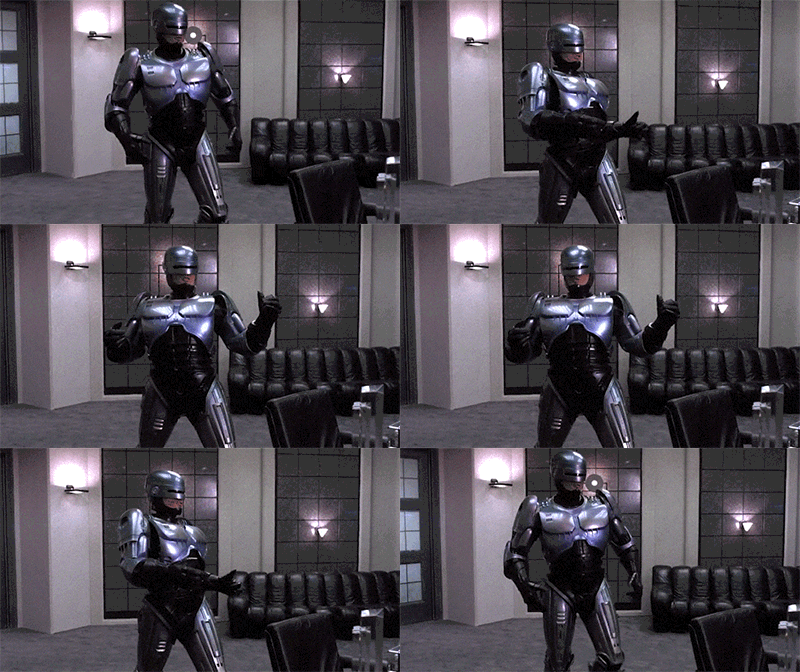
This is what happens when a natural fiber and a synthetic fiber fall in love. Who cares if their love isn’t natural? So they run away together and have a fabric baby that is part natural fiber/part synthetic. Like if a human and a robot had a baby and it was born Robocop. They are kinda freaks, but can also be REALLY AWESOME!

full

Like stretch denim. Something most people have fallen in love with. It’s denim (cotton) with a little spandex to keep it stretchy. So it fits all your curves, is flexible to move in, and can allow you to take your jeans off on the 3rd wear without having to unbutton them.

Or blend poplin: 65% Polyester/ 35% cotton. Semi breathable, crisp, irons well, resists fading, and resists wrinkles! Its no wonder it’s used for uniforms.

When not making magical happy things that defy normal laws of fabric physics, they create cheap alternatives of more expensive types of fabric. For example: You know you need a wool texture for a coat, but wool is $20 a yard, a wool/poly blend can cost half that! But you are reducing the breathability a bit, so it might actually make you sweat more than normal wool would.

tumblr_nieju6v7R51rz6w0do1_500

So you’re ready to shop but aren’t sure where to find the fiber content? If you’re in a fabric store, check the end of the bolt. It’s mandated by law to have the fiber content listed. Online fabric stores will have it listed in the product description.

What’s your experience with fiber content? Is it something you’ve spent a lot of time thinking about? Are there fiber types you like to use? I’d love to hear about your experiences!

Until next time…

*banner photo credit http://www.flickr.com/photos/95721592@N00/15786685051

Posted on Categories articles, Cosplay, free downloads, Series, TutorialsTags , , , , , , , 1 Comment

Cosplay Starter Kit: Planning your costume (Part 2)

CSK_pt-2

Last time I talked a bit about narrowing your costume selection down, and this time I’m going to go into the nitty gritty of planning out the costume. You can do this for all of your costumes first, and then narrow down or you can do it after. If you’re new to making costumes, you might want to do this step first because it will help you figure out all the bits and pieces for each costume and you can evaluate your time, skills, and costs early. This isn’t my first rodeo, so I have a pretty good grasp of what skills I have etc so I’m comfortable estimating that on the front end.

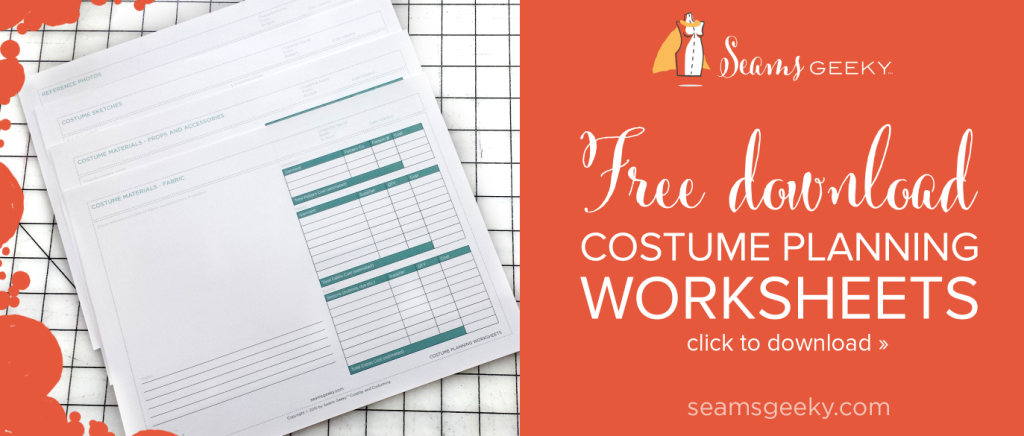
I’m a visual person, so I’ve created some worksheets, you can get these for free (Yes! Free!) These are pretty great because you can 3-hole punch ’em, put them in a binder and keep them for future reference if needed.


Screen Shot 2015-05-21 at 4.36.33 PM

Now for the meat and potatoes of today’s post: here’s how I plan out my costumes and use the planning sheets. My examples are digital so they are easier to read, but I do a lot of sketching by hand too.

Aquaman
I’m bookin’ it to squeeze in my Aquaman costume by HeroesCon (a mere 3 weeks away) between some swimsuit commissions and a wedding dress, so planning is crucial!

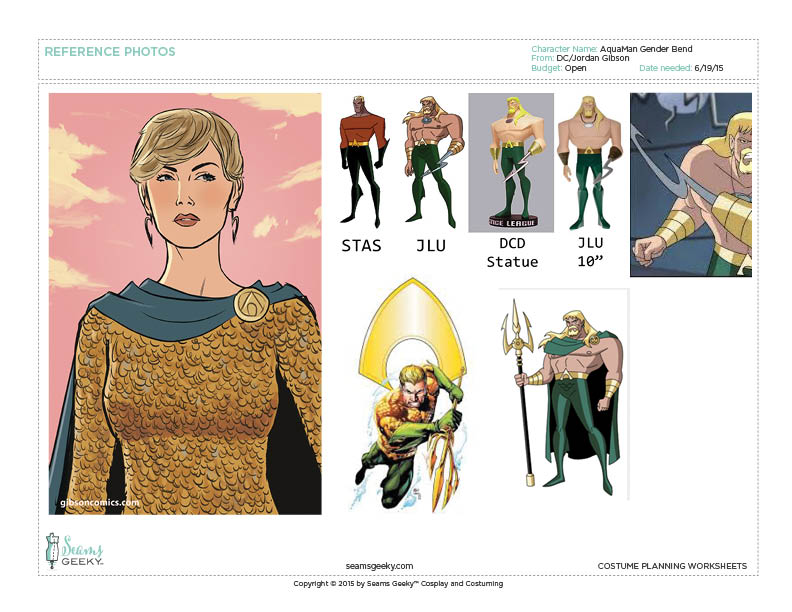
Page 1: Reference Shots
First things first, Grab all the reference pictures you can find. The internet is full of great shots (normally) but you also might need to go straight to the source material and/or sketch stuff out. I usually do both. I was lucky enough to have the artist sketch out the costume details for me (thanks, twitter!). I also grabbed different Aquaman shots for color, shapes, and specifics.
SG Costume planning worksheets_2015

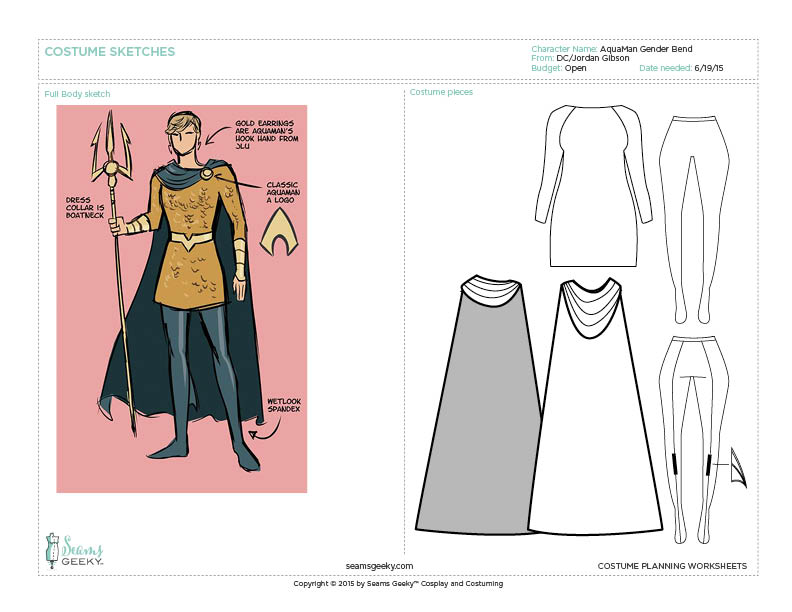
Page 2: Costume sketches
The next bits aren’t too far off of industry fashion line sewing:
I start drawing out all the bits and pieces. ALL OF THEM. Don’t skimp on this stage. The drawings don’t need to be works of art, but need to be clear enough so you know what you’re doing. Draw the front, the back, accessories, shoes. Get it all out there. Not only will this help you figure out everything you need, a lot of time it helps you get your mind around how things need to be constructed, or process you might need to learn.

SG Costume planning worksheets_20152

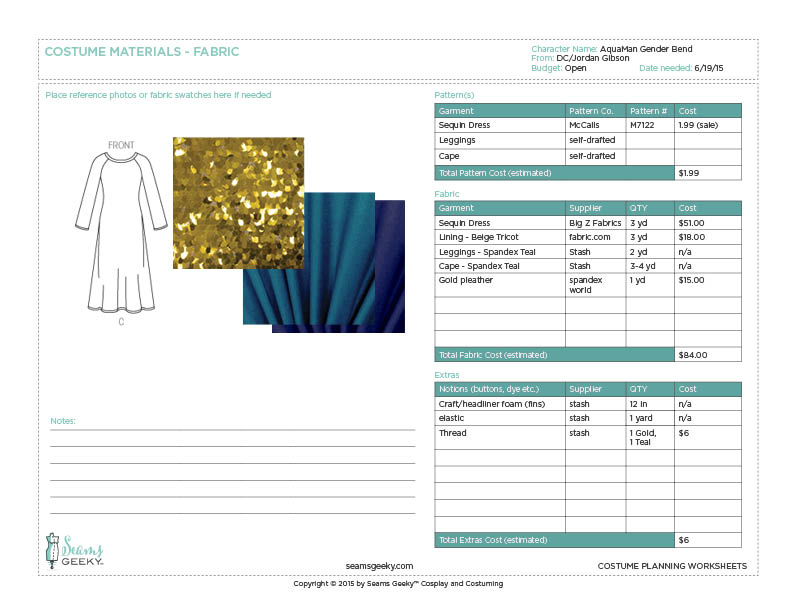
Page 3: Costume Materials  Fabric
This is a sewing blog of sorts, and I personally hate refashioning, but if you are buying and/or altering ready to wear, you can go looking for pieces that fit what you’re looking for right now. But you might want to stay tuned to this part because it could help you find the pieces you need a little easier.

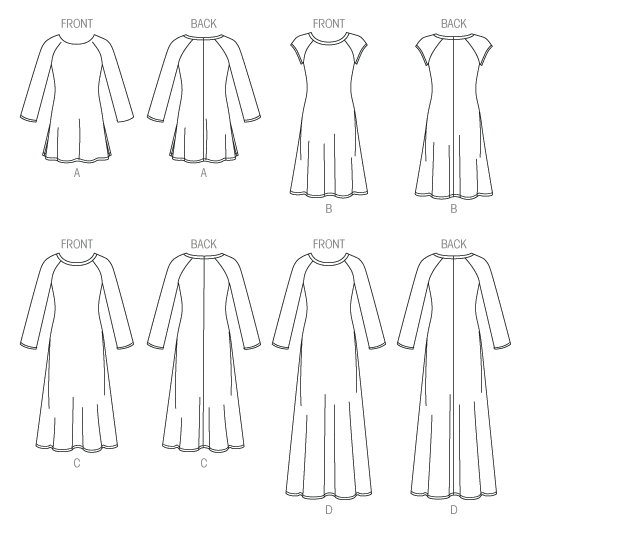
If you are not comfortable drafting your own pattern, now is the time to look for appropriate ones. You have your sketch, and all patterns have technical sketches! This is probably the coolest thing I nerd out about with patterns. It’s so easy to get distracted (or lured in) by how cool the picture looks on the envelope, but we are looking at the black and white line drawing. This shows us the bones of the pattern. I like to do this whether I use a pattern or draft my own because it also helps me estimate the yardage I’ll need of specific fabrics.

I’ll be using McCalls 7122 (view c) for the dress:

McCalls M7122


Screen Shot 2015-05-20 at 2.45.45 PM

I chose this pattern because it doesn’t have a lot of sewn in shaping like darts, and I like the raglan sleeve because it’s less easing I’ll have to do inserting the sleeve, which with sequin fabric that’s pretty pricey and not the easiest thing to work with, seems like a plus. I’ll be making some changes though, I need to raise and lengthen the neckline to make it boat shaped neckline, and take in and shorten the bottom of the skirt as well.

The leggings I’ll be self drafting because it goes over shoes, but this McCalls pattern also has a legging patten I can use if I want. Yippie! I’ll be drafting the cape because it can’t be that hard, right? (This is how I get myself in trouble.)

I then went online and grabbed some swatches, but you can glue or pin on actual fabric swatches here as well. You can order these online or check with your local fabric store, they might give them to you for free!

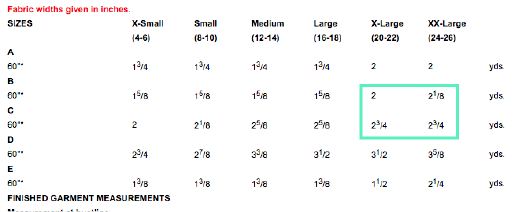
Now that the blueprint has been set, I can work out the costs and keep track of the fabric I need to buy. I know from the pattern envelope I need at least 2 yards of fabric, so I’m rounding up to 3 Just in case. I’m just a round up/play it on the safe side kinda gal.

Screen Shot 2015-05-20 at 2.45.54 PM

I’ve never worked with sequins to this capacity before so I want to make sure I have enough in the event of mistakes, and apparently you need extra sequins so I know I’ll be covered. The sequin fabric is somewhat stretchy, based on a power mesh backing so I’ll need a lining as well. I also learned from the internet that you should always line sequin dress because they can be scratchy. I also am utilizing some spandex from my stash for the legging and the cape that’s left over from bridesmaids dresses. I also know I’m using gold stretch pleather for the belt, so I put that down here as well.SG Costume planning worksheets_2015

Once my fabric is picked out, I can put down where to buy it (really important incase you need to order more) and the cost. Finally, I try to think of all the notions I’ll need; zippers thread, elastic, etc and put that down. I can now add up all the costs and get an estimate for how much money I’ll be spending on fabric. Yay and boo, all at the same time.

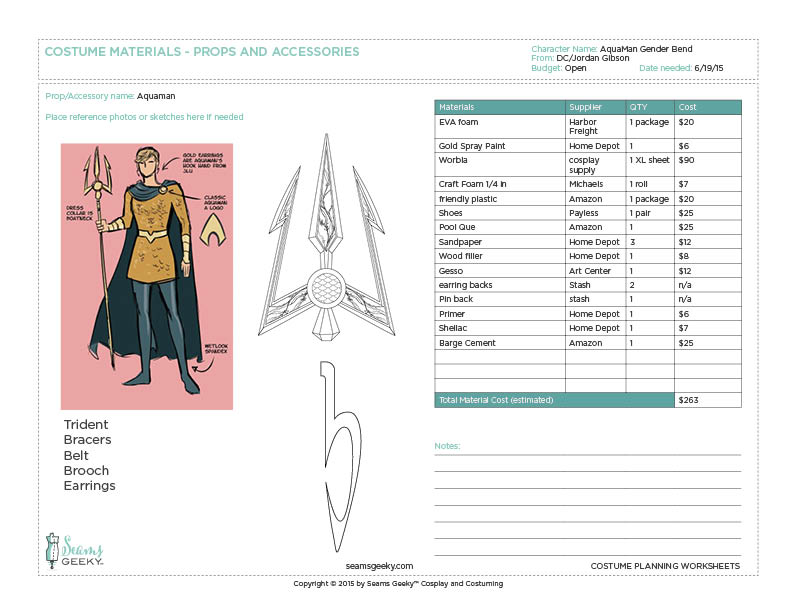
Page 4: Costume Materials — Props and Accessories
The last page! Or maybe pages, depending on your costume. I use the same process as page 3. I drew out my Trident design in illustrator so I’d have quick reference (I have it actual size elsewhere), a quick side view of the earring, and a list of the other accessories since they are pretty well laid out on the sketch. You might need to do a bit of thinking here to try and wrestle out how exactly you plan on making all your prop pieces so you accurately choose your materials.

I crammed all mine on page because there isn’t a lot of detailed pieces, but you might want several pages with deeply outlined materials and budget costs for each accessory piece.

I listed and sketched out the accessories I’ll need to the side and just added all the costs together. You can see I tried to list every darn thing I could think of that I’d need to make everything. You can put wig costs, shoe costs, plus base materials here.

SG Costume planning worksheets_20154

Then add up your costs from page 3 and page 4. Maybe scream, maybe cry, maybe get really excited because it will cost less than you think. Whatever your reaction, you’re ready to start making!

Next time I’ll be talking a bit about different kinds of fabrics for those unsure about what fabrics to choose.

*While writing this post I found a phone app called Cosplanner which you can track all your costuming planning the same way digitally. It’s pretty cool! But I like having the sheets to reference because they are bigger and I can take notes and draw on them. But I’m an old fuddy duddy that’s stuck in my analog ways.

Posted on Categories articles, Cosplay, Series, TutorialsTags , , , , , , , , 1 Comment

Cosplay Starter Kit: Planning your costume (Part 1 )

starterkit_1It’s love at first sight. You see it, you need it, you want to make and be inside that wonderful outfit. You love the character, you love everything about their costume and you’re ready to to get elbow deep in fabric, silicone, latex, Worbla whatever to make sure this beautiful vision you see becomes a reality. You stare at photos online, dreaming of what it would be like to put on those wings and show your love to the world.

It’s so easy to get excited and get lost in the process that things don’t turn out quite as you planned. Maybe the fabric isn’t right or it doesn’t fit how you wanted. You are convinced evenly distributed spray paint is a thing of myth. You’ve cried more times over something going wrong, and you have 2 days before you leave for the con, and you just cut two left sleeves out of your last bit of fabric. Or your clear coat won’t dry, or accidentally bleach half of your perfectly dyed fabric cleaning the washing machine…

I get it. I mean, I reeeallllyyy get it! Through trial and error, and working in a deadline focused industry, I’ve learned over the years how to properly plan a large project, and no project is larger than a cosplay (not true, but it feels that way).

Planning a costume is the most fun! I plan more costumes than I could manage to possibly make. It’s a process full of possibilities and excitement! And if you’re anything like me, you love finding out everything you can about the character, costumes, materials needed and reverse engineering how something might go together. But I’m no fool, It can also be really daunting if you’ve never done it before. Here at Seams Geeky we try to take as much confusion out of the process as possible. That means lots and lots of research and planning, including calendars and budget sheets.

Ok, first things first. You bought your con tickets and hotel a year in advance, and now you just need to figure out what to wear!

Figuring out what costume(s) you want to make 
Dig through your files (or pinterest boards), meditate, search your soul and determine what costume or costumes you want to make. Gather them all! Then start sorting through all of them and narrow it down.

First: Evaluate skill level.
This isn’t the end-all-be-all but you need to start with what you are comfortable with. Making a costume is great because you learn SO much each time you make something. What skills do you already posses? What skills are you confident in? What fabrics are you comfortable using?

Next: What skills do you want to learn?
Want to work with Worbla but never had before? Great! Never made a petticoat and want to learn? Fantastic! The best part of running into battle (and I consider every costume a battle) is it’s a trial by fire.

But you have to have time to learn. You’re probably not going to get it right the first time, so onto part 3:

What is your time line?
Do you have a whole year to make one costume? Do you have 2 months? Do you feel confident that you can learn what you need to in time, or will you be slapping it together at the end?

Now this one is optional: Think about your body image.
It’s a tough subject to talk about, especially with cosplay, so I want to be clear that I’m not saying throw out costumes because you’re worried you don’t have the same proportions. Screw that nonsense, wear what you want! What I’m saying is: If you think you need to lose 20 pounds before you can wear the cosplay, you should lose the 20 pounds (or be well on the way to losing it) before starting construction.

Tip sparkle rightI try to emphasize this with any custom garment I make:
A body can change a lot, by building muscle, by losing fat, so once you start making your costume, try to stay the same weight. The last thing you want is to have to take in 2 inches because now it doesn’t fit right. That’s a lot of last minute stress you don’t need.

I was talking to a client the other night about a costume, and she mentioned she wanted to lose some weight and I had to let her know that her costume would take about 2 months to make, so come July, she has to stop losing weight and stay the same size, otherwise she’ll risk the costume not fitting.

And finally, what is your most favorite that you HAVE to make right now? Because it’d be nice if the world was all puppies and rainbows and we did everything by the books, but sometimes passion completely wins out!

*Drum roll please*
My 2015 Cosplay list I put together the end of last year with a focus of getting several complete for DragonCon. Here’s why I chose each one per my narrowing parameters:

I’ve done a decent amount of comic cosplays in the past, and I was trying to diversify a bit this year. I originally wanted to do 1 Comic Character, 1 anime character, and 1 Video Game character. Cover my trifecta of geekiness. Somehow, though It ended up being very anime heavy. I don’t mind this, because anime is my FAVORITE, and it’s how the cards of fate fell.

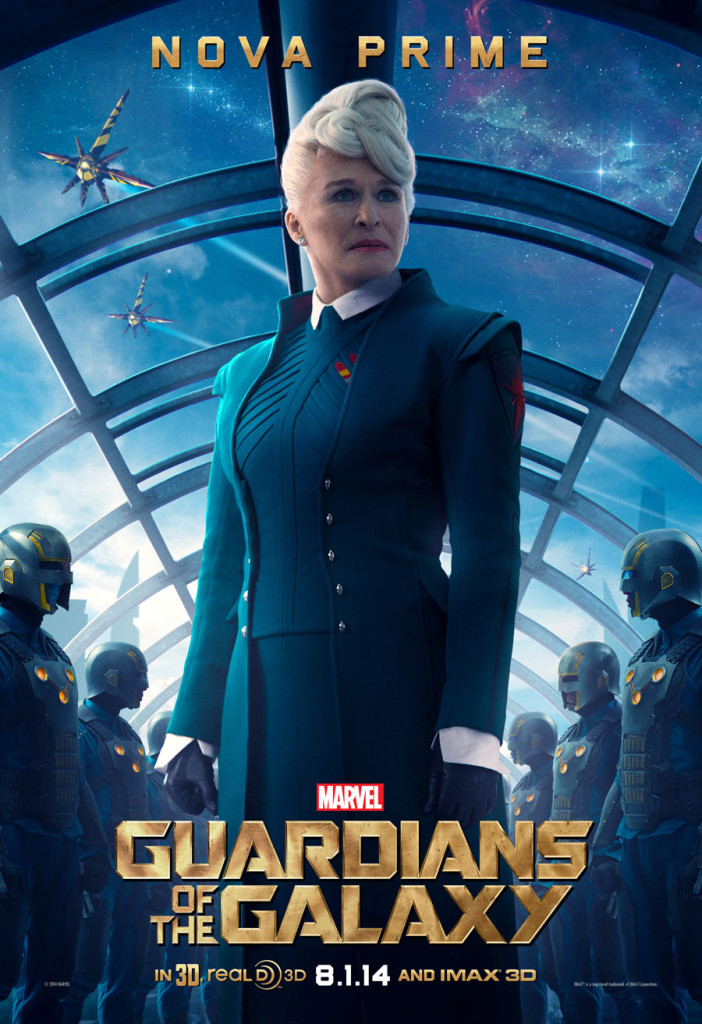
Nova Prime

gotg-bus-shelter-nova-prime-v1-lg-3c7d7

Why is that? I NEED TO MAKE IT. The second I saw Glenn Close walk on screen in the uniform, I knew it was destiny. That’s a #5. But I also know I can accomplish it. There’s going to be some pattern drafting, a little bit of molding and casting (enough to learn from, but not too much to feel overwhelmed. And if need be, I can do some last minute foam pieces), and I have a friend who’s going to style the wig. DONE!

Meryl and Milly:
trigun_mm0013

I’m REALLY excited about this because I get to cosplay with my bestie! The outfits are mostly sewn, so that’s in my wheelhouse. Plus, we are totally Meryl and Milly. It’s going to be great. I do have some apprehensions with the guns, but if the big stun gun doesn’t get made, it won’t kill the costume and there’s some derringer Air Softs out there in a crunch.

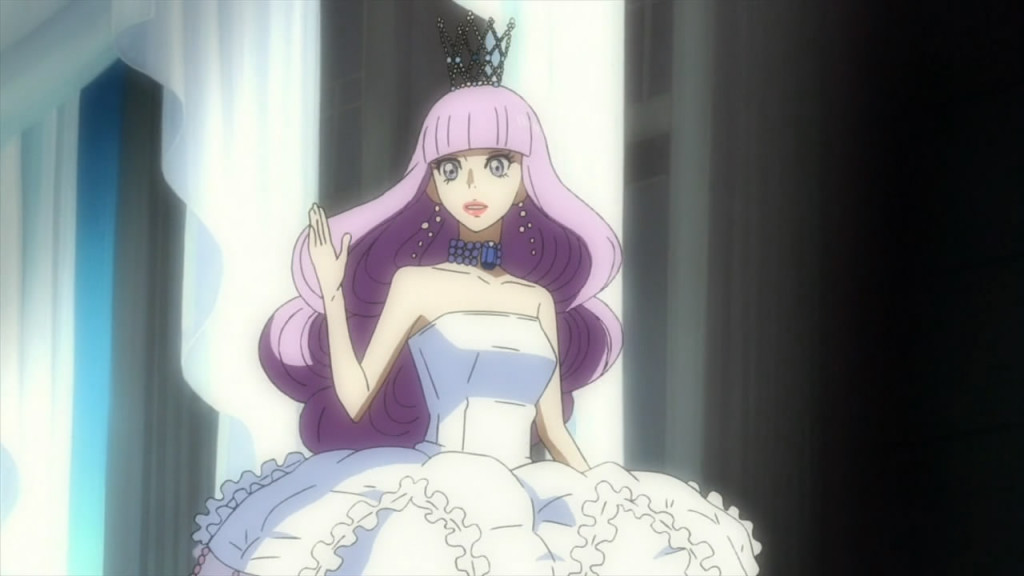
Kuranosuke from Princess Jellyfish:
Kuragehime - 11 - Large 23

If you haven’t caught on by now: Princess Jellyfish Forever (PJF). Also, I want that dress, and it’ll be fun to make without being too stressful. And I love Kuranosuke. I also think it’s funny to be  girl dressing as a boy dressing like a girl…

I had two optionals, but they needed to get set aside for another day. But then this came along:

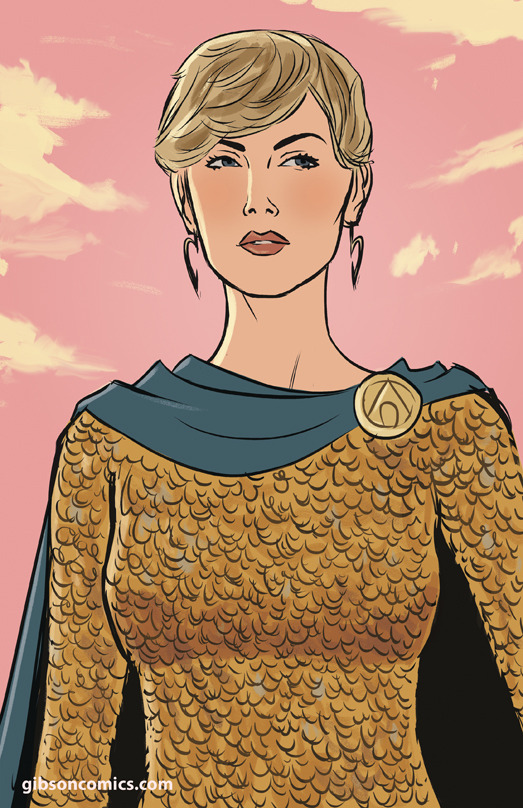
http://gibsoncomics.com/

That’s a combination of all things I love, genderbend, Aquaman, and a dream casting of Charlize Theron AS Aquaman. Plus, Jordan Gibson dress me the full body costume for costume reference because he’s awesome. I’ll also get to play with Worbla, which has been on my list a long time.

So I had to say goddbye to Kuranosuke. For now.

tumblr_static_cybj3308j1w8ocw4k08o0wcwc

Coming up in part 2: getting into the nitty gritty of costume specifics, plus a freebie for everyone!

What are your cosplay plans for the year? Do you have any apprenstions? I’d love to see what you plan on working on!


Posted on Categories SeriesTags , , , , , , , , , , , Leave a comment

Evaluating your closet

I’ve been meaning to post this for awhile, but with planning a wedding freaking me out, wardrobe building has taken a back burner.  So without further ado…

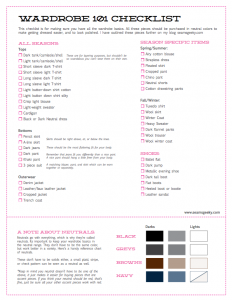
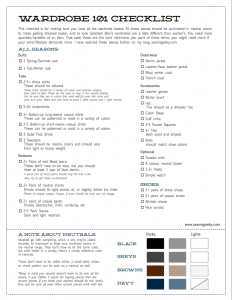
After reading article after article I’ve put together a basic wardrobe checklist. Huzzah!

Without a huge long intro, you can download these checklists here:

Women's Wardrobe Checklist
Men's Wardrobe Checklist


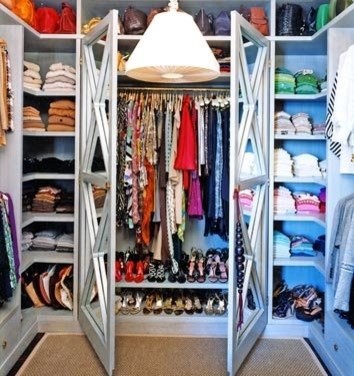
Cleaning out one’s closet can be a daunting task, but before we build our wardrobe, we need to see how much of our wardrobe we actually have already. So often we have clothes in our closet that are perfect basics, we just don’t think of them that way. I think it’s really easy to think of everything in your closet as a statement piece that speaks mounds about who you are, where in reality we have all the basics we need hidden in plain sight.

I’ve included a key to neutrals on the bottom of the checklist. I refer a lot to “Dark, Mid-tone, and light neutrals” because if someone looks awful in black, you shouldn’t buy black things because it’s on a checklist. A “little black dress” can just as easily be a dark grey, brown, or navy. If you’re not sure what colors work best on you, drape different colors of fabric near your face and look at yourself int he mirror. Some colors will drain color from your face while others will make you glow.

I also want to mention that a neutral for your wardrobe doesn’t need to be black, grey, brown, or navy. You can have red be a neutral, you just have to be careful that everything else you buy or make will work with red.

1

How to use your wardrobe checklist:
So with checklist in hand I ripped open my closet doors and started evaluating all the pieces of clothing in my closet. I pulled out each piece and evaluated it on the criteria:

  • Do I like it?
  • Does it fit?
  • Is this on my checklist?

If I like it, I try it on (unless I know it already fits) and evaluate the fit. After you try it on, look long and hard at yourself in the mirror. I like to stand back and squint my eyes. Turn around and evaluate different angles, then ask my lovely soon-to-be husband how it looks if I can’t decide.

A few tips for trying on clothes:

  • If it looks a little strange and you’re not sure if you like it or not, play with the hem. Sometimes taking a hem up or letting it out slightly can make a so-so skirt, dress, or pant look amazing on you.
  • Try on a pair of shoes you would wear with the outfit you’ve tried on. You might find out that those frump slacks look amazing when you throw on a pair of heels with them.

Trying on clothes and evaluating them like this will also give you an idea of what shapes flatter you, helping you pick out clothes in future. Pretty nifty!

Next, I compare it to my checklist. I then place it in 1 of 5 piles: 

I then organized my closet by type of garment and color so I can easily find items to wear. I put all items living in The Land of Ill-Fitting Clothes in a separate box which is labeled. I don’t want any clothes that aren’t wearable in my closet to distract and frustrate me.

Something worth mentioning:
A wardrobe basic that needs altering should not be crossed off your checklist until it is altered. You want your checklist to reflect what items you can actually wear now. This is the same for items living in the Land of Ill-fitting Clothes.

After going through my closet I realized I only had about 5 items on the checklist. I was shocked because I thought I’d have a lot more. But now, I am armed with items I need to make or find!
Stay Geeky

–Laurel

If you have any questions or comments about the checklists, just leave them in my comments. I’ll answer them the best I can.

Posted on Categories SeriesTags , , , , , Leave a comment

Defining your Style


Can you define your style in a sentence or less?

I tried to define my current style in a sentence, and then I realized that I couldn’t. I couldn’t even define what I wanted my personal style to be.  All I could think of was “frumpy” and “t-shirt and jeans.” This may have worked in my early 20s, but now that I’m a grown up in a professional environment, this isn’t exactly a look I wanted to be identified with who I was.

Considering I’m an Art Director by day, I decided to approach my personal style in the same way I approach a problem for a client, with inspiration and brain storming.

How to define your personal style:
First thing to do is to find pictures and colors that move you and put them together in one place.

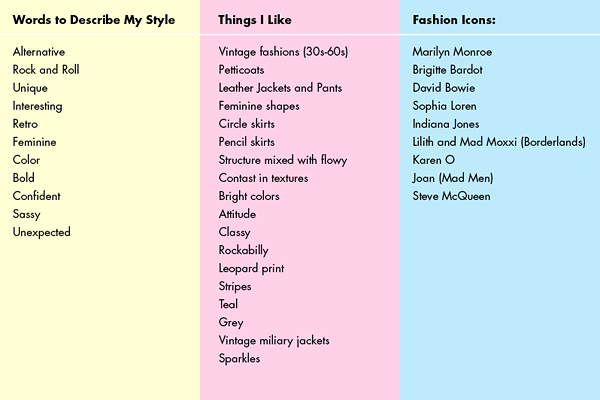
I used my Pinterest account and set up a board to collect my inspiration. I grabbed colors, styles, and people whose style I admire. I tried to really go with my gut, and grab things that spoke to me. I didn’t want to think, I wanted to just grab. I figured I could just sort it out later, and hope to find some sort of theme.

Things I learned:

So putting this all this knowledge together, what is my style?

I’m tentatively defining it as (drum roll please):

Sassy Femininity

I wanted to define my style as lively, bold, cheeky, spirited and embracing womanly shapes and textures. This definition allows me to easily pair urban and edgy styles that are bold and attention getting, while still having womanly shapes like fashions from the 40’s, 50’s and early 60’s.

You don’t want to limit your style by your definition, but you want it to be an easy mortar you can think of when you decide what styles to wear. And remember, style is about looking and feeling good in the clothes you wear, so if you don’t think you’ll feel comfortable or confident in don’t put it on your style boards. For example, I don’t feel comfortable or confident in shorts, so they don’t take a lot of prominence on my style board.

I suggest printing out or making a collage of images from your Pinterest board for inspiration, sorting the items  according to what drew you to them, and how they reflect your defined style. If you are super anal, you can put it in a notebook you take shopping, put it on your wall as a reminder to the look you want to develop for yourself, or just leave it on the internet for reference.

For my male readers:
For my whole “Wardrobe 101” feature I’ll include a section which target’s a man’s wardrobe. For this post, keep in mind that the process is the same for a man and a woman. Finding inspiration may be a little harder to come by, so I suggest finding characters in media that you are drawn to. What are they wearing? Do you like how they dress? Their attitude?
I started a Pinterest board for my fiance where we’ve started collecting fashion inspiration for him as well. I’m sort of forcing him along this journey with me.

If you have other ideas for defining your style, want to share your style board on Pinterest, or just want to post your style definition, I would love to read it! Just leave it in the comments or let me know on twitter. I really want to make this wardrobe series something that a group of us can go through at the same time, either like a small community or a support group.

Next week: What makes a good wardrobe

Posted on Categories SeriesTags , Leave a comment

Wardrobe Theory


I never have anything to wear.

Seriously.

And I’m quickly finding out that, as an almost 28 year old, I still dress like I’m 15. Probably even worse, because I use to dressed pretty cute at 15. I attribute this to several factors.

1- I’ve gained weight. I don’t want to admit it, but I realized that slowly over the past few years more and more of my clothes got banished to the land of ill-fitting clothes.
2- I’m lazy. I’m lazier now also for several factors, one I blame on my hair (I’ve been growing it out for my wedding, and it’s so long, i don’t know what to do with it) and the other is my extreme love of cuddles.
3- I Stopped paying attention to fashion trends. I just zoned out on fashion. As soon as skinny jeans hit the scene 3 or 4 years ago, I tuned out. Also, with weight gain, you tend to hate shopping.

So I checked a bunch of books out of the library about “defining your style” and “How to always dress your best.” I learned it all came down to the same thing, defining your basic wardrobe. This got me thinking about my wardrobe, or least what was left in the wearable pile. I knew I had to change it up, and stop sewing fun pieces that don’t go with anything, and start making sure I can make outfits.

I’m sure I’m not the only one with this problem, and I’m at a point where I’m ready to dress like an adult. Considering you can’t nominate yourself for “What Not To Wear,” I’m taking matters into my own hands. I encourage anyone else who feels this way to join me. You don’t sew? That’s ok! Just go out and find items that fall into the basic wardrobe category.

For all of 2012 I’ll be focusing on creating a wardrobe that works.

A few things I’ll cover in this on-going wardrobe series:

  • What makes a good wardrobe
  • Defining your style
  • Organizing you closet
  • Planning a wardrobe
  • Undercover: learning the basics of undergarments
  • Making (or buying) great clothes that fit

It should be a lot of fun! I hope you join me.

Stay Geeky

–Laurel