Posted on Categories articles, Conventions, Cosplay, TutorialsTags , , , , , , , 28 Comments

9 Tips for Working With Sequin Fabric

Sequin Maddess header

Straight up, everyone: Sequin dresses are a bitch to make. My biggest piece of advice: Don’t do it! Oh, you’re going to do it anyway? Basically this is going to be like a sex talk: If you’re going to do it, at least have the knowledge to do it safely and so you know what to expect.

Working with sequins in general are a total pain, but GLAMOUR!! Now, I knew it wouldn’t be easy. I can be blindly confident about taking on projects, it happens all the time. I tend to over-research to the point of WebMD psychosis levels.

aquamaam
^ That’s the dress, you guys!! *Photo courtesy of Comic Alliance

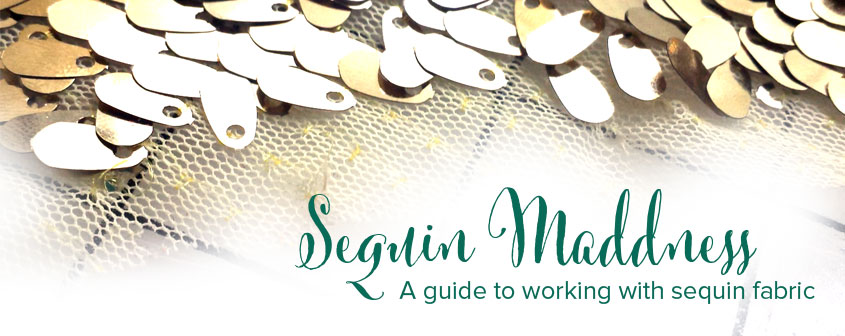
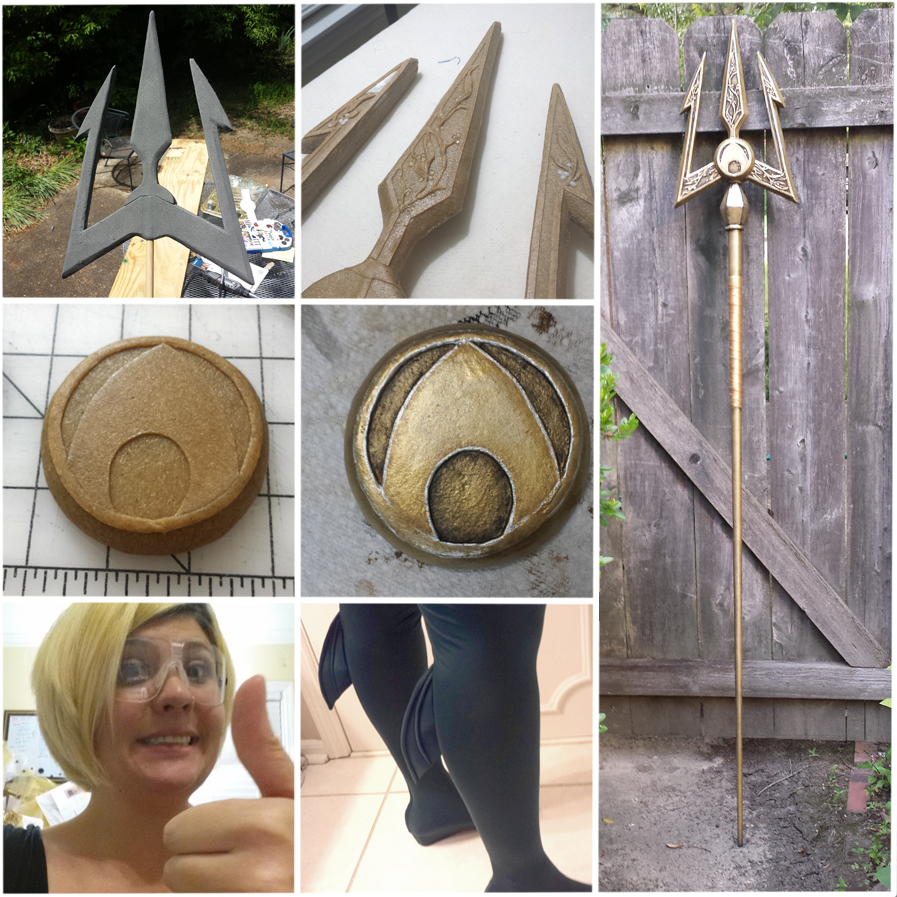
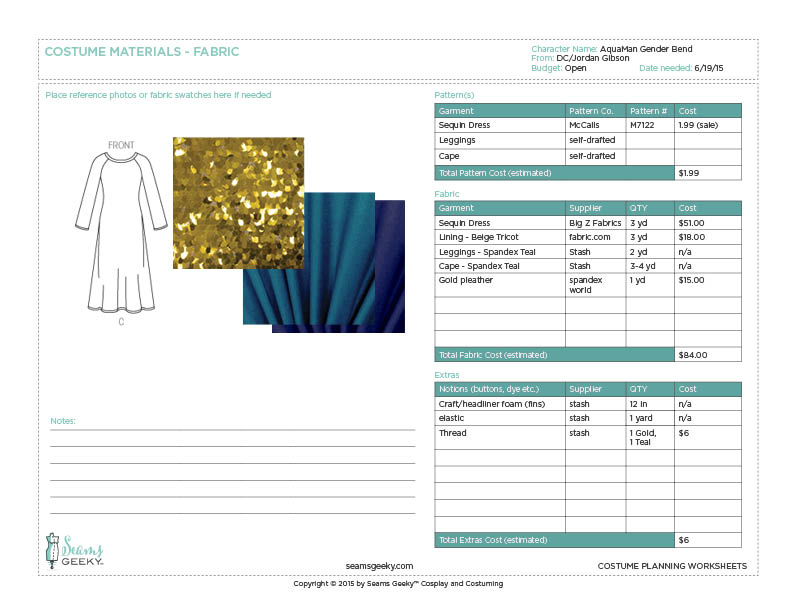
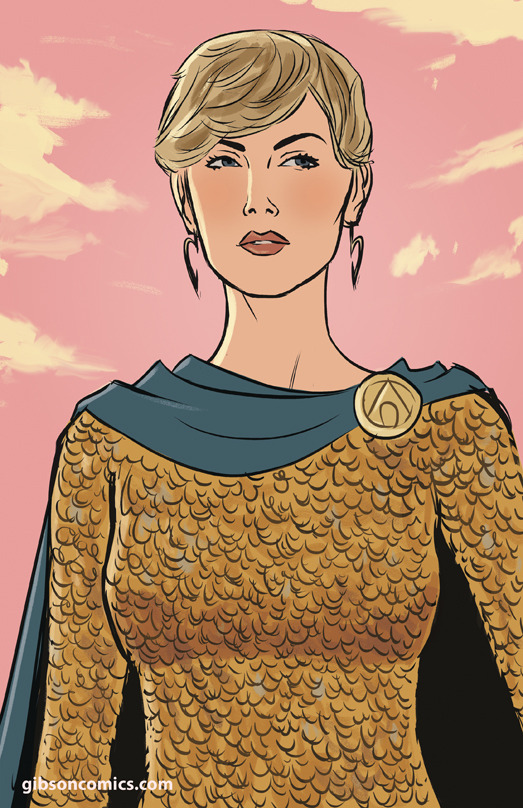
Did I mention I recently finished this gender-bend of Aquaman?

The costume was full of unknowns to me, so it’s my own fear that’s kept me from starting the focal piece of the whole costume: the gold sequin dress. But I was also excited, because I never made a sequin dress before. I was smart and took pictures along the way, so you lovely readers can benefit from my pain and suffering.

Without further ado: Working with sequins.

At the end of the article, I’ll post some of the pages I looked at when researching that are much more positive about working with sequins, with headlines along the lines of Add a little sparkle to your wardrobe. 

1- Sequin fabric is EXPENSIVE
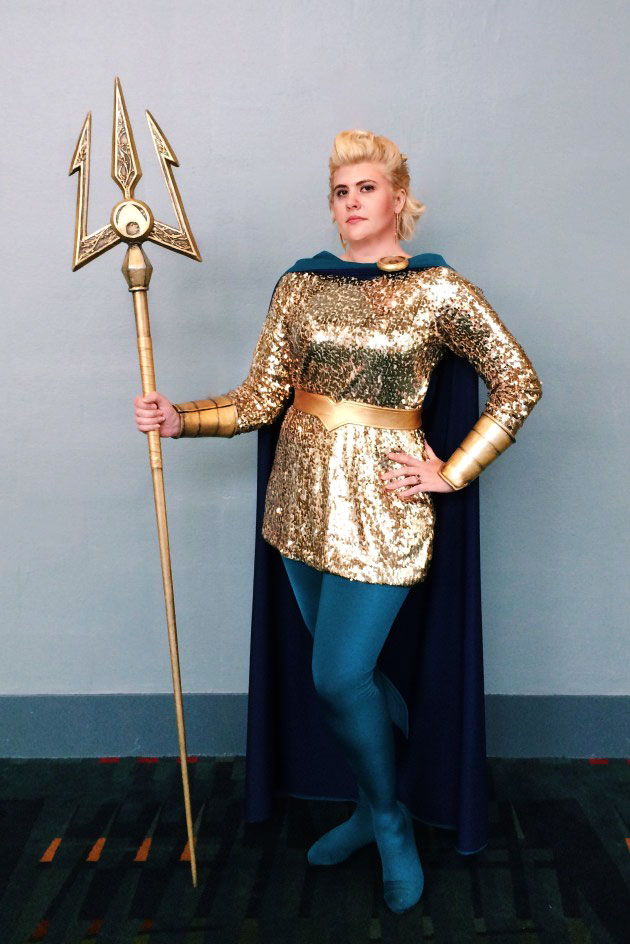
So make you have enough in the event of mistakes, but not so much you break the bank. It also makes it daunting to cut into. Not to mention the added fear of sequins falling off. That’s right, you are paying big money for the most fickle fabric known to man (might be an exaggeration). The way sequins are attached to fabric is they are stitched to the background in rows.

That one thread holds a whole mess of sequins!

Makes sense, right? Except a loose thread can make you lose a whole line of sequins. WHAT? This will come into play later.

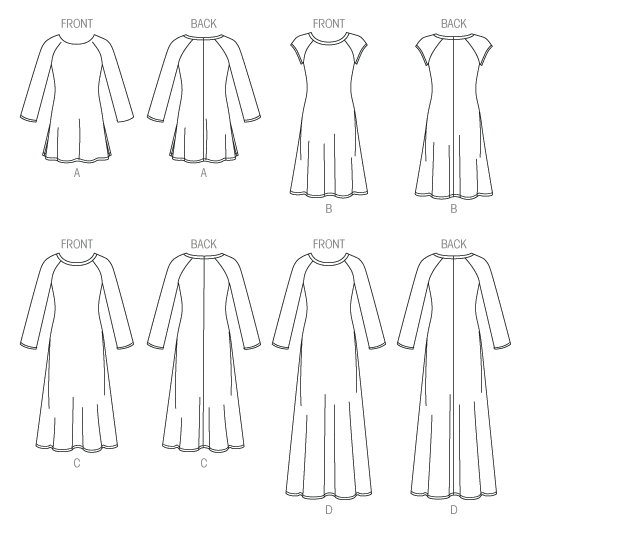
2- Make sure your pattern is simple
Check and check! I mentioned in a previous post I’m using McCalls 7122. It’s really a simple dress, 4 seams total. No zipper.

Why does a simple pattern matter? Because you have to do a lot of prep of the fabric before you sew, so adding in darts or zippers or fancy collars, or even princess seams is a lot of work! I think the nice way the articles put it is “Let the fabric be the focal point.” Most sequin fabric is on a mesh or stretch backing anyway, so you can get away with less shaping.

3- Prepping Sequin fabric takes FOREVER!
I read an article that said, “A sequin dress will take 3 times longer to make than normal, so plan accordingly.” I went “Ok, this dress would normally take me about an hour. 1 x 3 = 3 hours, but I’ll add in a few more hours to be safe, I should be able to get it done in an evening.”

WRONG! So wrong. So very wrong. Just to prep the fabric took me about a week of evenings. If I judge by the anime I was watching when I removed the sequins, it took me close to 13 hours to prep the fabric. 13 HOURS. And that was just to get the fabric ready to sew, then once the dress is assembled, you have to hand sew sequins back on. From here on out I will be keeping track of approximate time spent on this dress so you can estimate your own.


Side note: I watched Red Garden. That anime is beautiful, and I might have to re-watch it because it’s so pretty and I hardly saw any of it because I was staring at sequins the whole time. It’s like Pretty Little Liars (well, the only episodes of seen of it, which is like 2) but with monsters.

4a- Make a mock up
I used stretch mesh for my mock-up since it matched the fabric the sequins were sewn on, and there’s no pictures because that thing was almost fetish worthy in its sheerness. But I learned a lot about my pattern, and took it in a lot.
Time spent: 45 Minutes

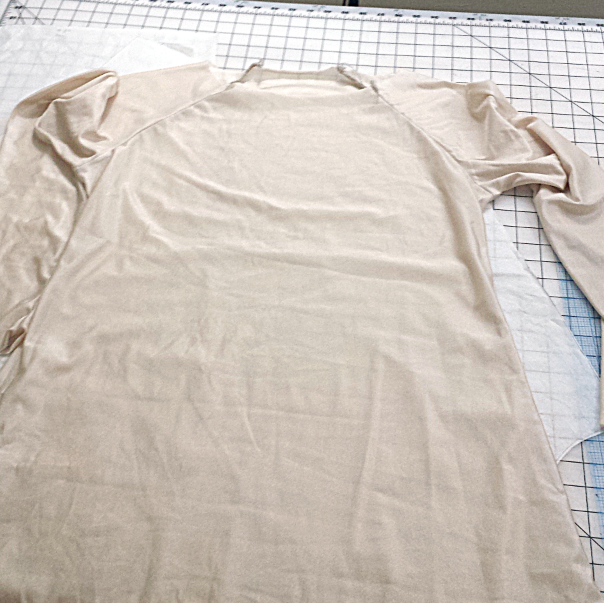
4b – Treat your lining like a second mock-up and sew it first.
Oh, and ALWAYS PUT IN A LINING. I called my lining my old lady night-gown because it was made of nude tricot. I used tricot because it has a similar stretch profile as the sequin fabric, and it was silky so it would feel nice against my skin but also not snag on the sequins. I made even more alterations to this lining for fit because I wasn’t getting distracted by my bellybutton like with the mesh one.
Time spent: 45 Minutes

Old lady nightgown FOR THE WIN

But why is the mock-up important?  I realized after all my fittings that the weight of the sequins, and the fabric being a little stretchy made everything hang longer than anticipated, plus I forgot to transfer some of my pattern changes (whoops!). So, I had to go back and remove more sequins everywhere I needed to take it in or shorten it. Just add more time to the sequin clock
Time spent: 2 hours

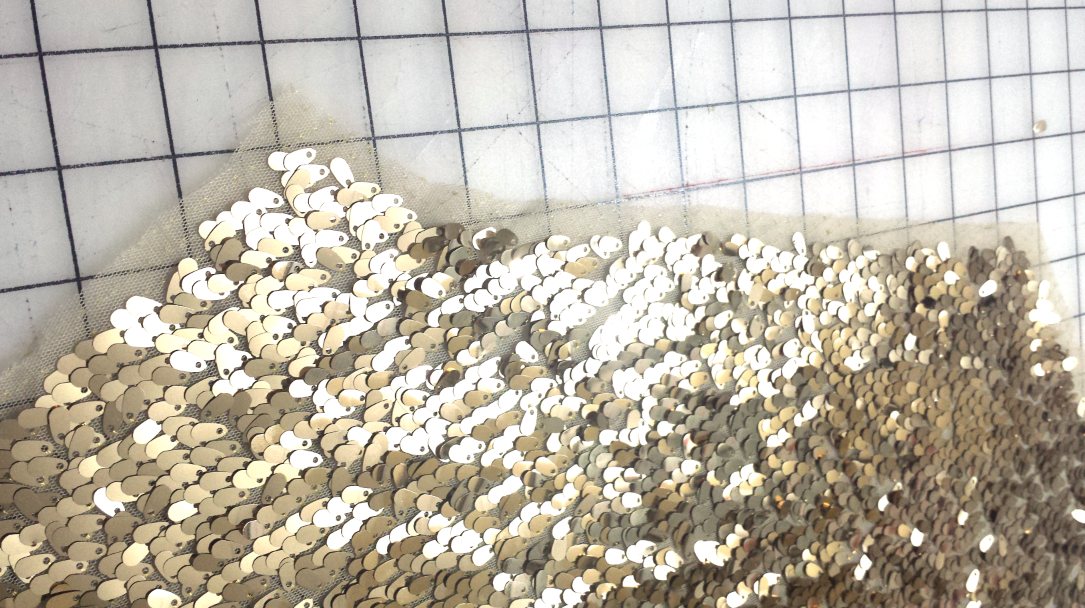
5- Sequins have a Nap
That means, sequins hang a specific way and shine a specific way. Find out which direction your sequins hang and lay everything out going one direction. I know it can feel like you’re wasting fabric, but you know what really wastes fabric? Having to re-cut a piece because the sequins are “hanging” vertically. Also, some sequins are one color on one side, and a different color on the other, so a piece cut in an opposite direction will really stand out.

tracing patter_sequin

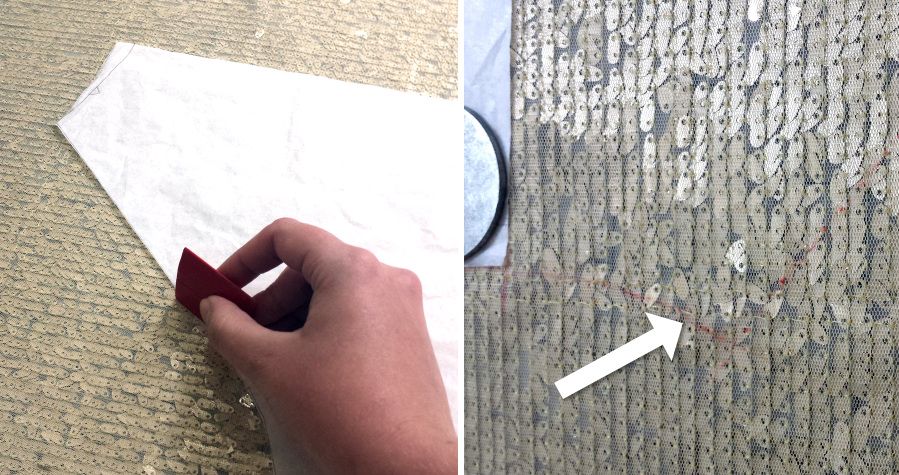
Things to know when cutting out the fabric: Pinning is definitely not something you want to mess with, and cutting on a fold is not recommended. Layout and trace your pattern pieces onto the fabric from the back. I used red tailor’s chalk, then remove the pattern piece and cut along the line.

crappy scissors

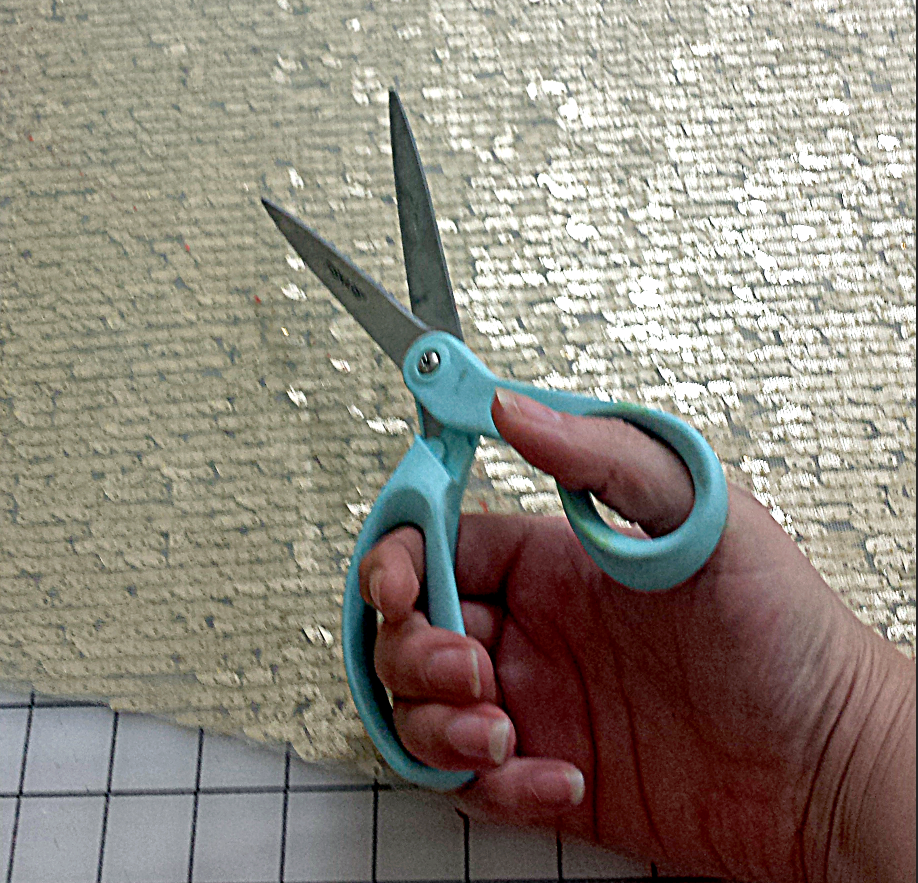
Also, don’t use your good scissors. I used my gift wrap scissors because those sequins will knick and dull your good scissors so fast!
Time Spent: 1 hr

6 – Get ready to live in a disco ball

Left: Table after cutting out a piece Right: sequins from trimming one seam allowance

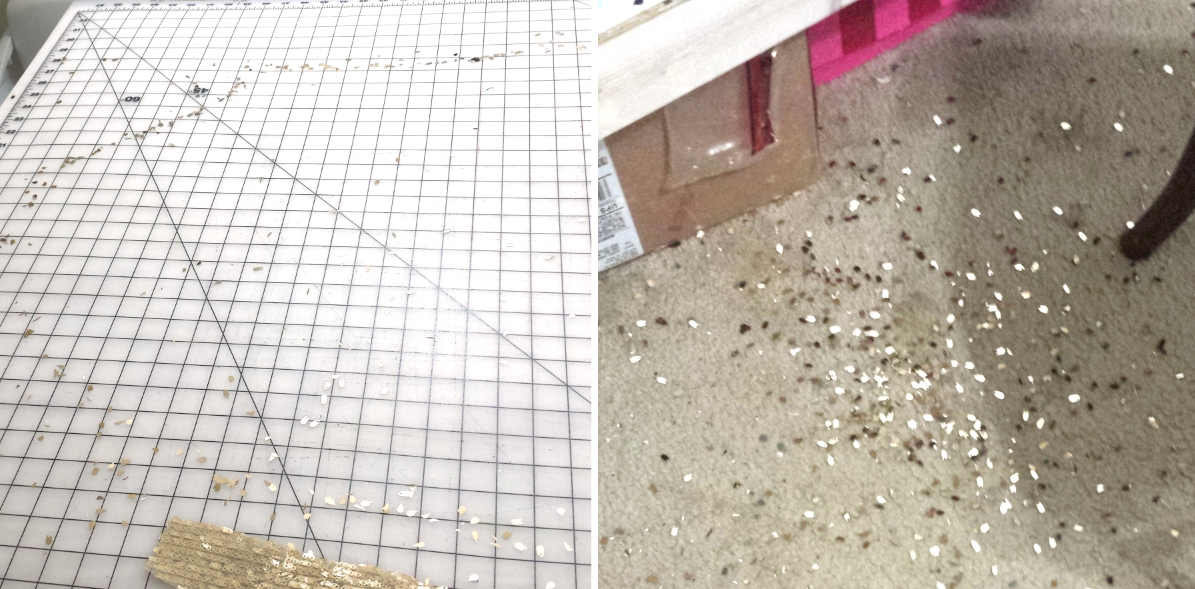
You may see the storm of sequins rolling in just from cutting your fabric, but you are not ready for the tidal wave of sparkles that are about to drown you. I joked with my husband I was like a sparkly Family Circus cartoon, trailing sequins in a path around the house. I also littered the city of Memphis with them, the work conference room, my car, etc. It’s basically giant glitter.

Before you sew, you need to take all the sequins out of the seam allowances. This allows for several things:
• Reduce the risk of sewing machine needle breakage
• Reduces seam bulk
• Not having sequins sticking straight out and jabbing everything if you sew through them.

trimmed allowances

If you have, like me, kept your sequin fabric folded in the box it shipped in, the sequins will most likely not lay flat at all. I suggest letting gravity help you and hang the fabric vertically for a few hours (I left mine overnight) before trimming the sequins off.

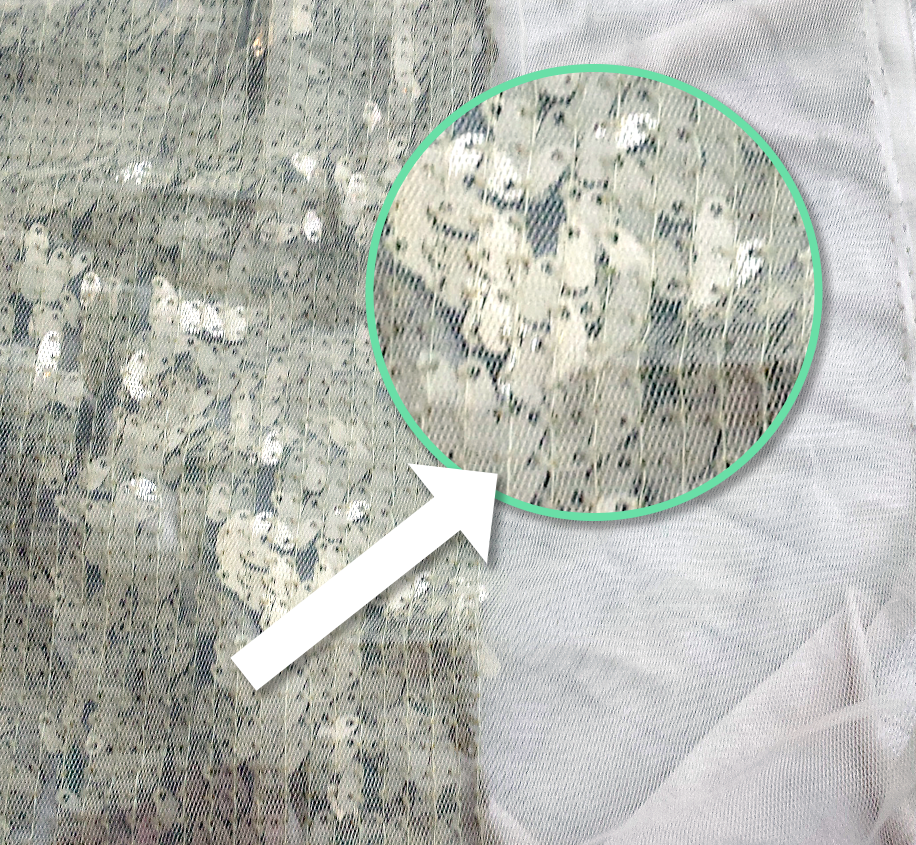
And you’ll want to trim off the sequins. If you use your seam ripper to take them off, most likely you will weaken the already crazy fragile stitching that holds the whole line of sequins together, so grab some small hand scissors that you don’t care about, and start clipping off the sequins.

I found clipping here gave the best and quickest results:

clipping sequins

I would also err on the side of removing too many sequins than not enough because sequins move around while you sew and have a life of their own, and a broken needle is how we loose an eye.

Did I mentioned this took forever? This is going to take forever. And I asked around for tips on making it go faster, and found out there isn’t any. Your hands will hurt. Mine were swollen and I broke a blood vessel near my knuckle where the scissors rested.

Also, if I were to do it again, I would only clean up the seams and neck hole, and not the hem. Due to sequin fabric weight, the hem is going to hang much lower than you anticipate, so sew it together first, then remove the sequins at the hem and bottom of sleeves if applicable once you know the proper length.
Time Spent: 13 hours

7- Sewing up the dress is going to seem like a reward from the heavens! But it’s not!

However, the dress should go together quickly, because it’s a simple sewing pattern. I stitched it together and lined it in less than an hour. Also, wear your trusty safety glasses. The chances of you breaking a needle or sequin pieces fling through the air is high. I used a zipper foot so I could get as close as possible to the sequins without having a full foot trying to feed through over the bulk.

sequin_sewing machine

I used a stretch stitch on my old battle horse of a Janome because a straight stitch kept puckering and I wanted to maintain as much stretch as possible. The downside? There is no unpicking at that point. The thread is hard to see and the stitches are really small.

sequin fray check
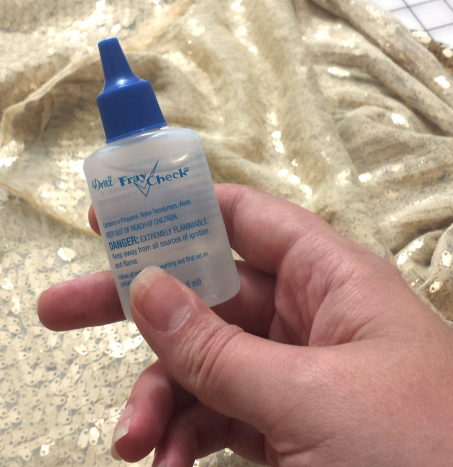
I also fray checked each seam, because I’ll be damned if even 1 row of sequins comes loose! I also installed the lining kind of like a bagged jacket. I attached it at the neck and the ends of the sleeves, but hanging free at the bottom.

DO NOT IRON. It can melt the sequins, degrade their color, or melt your backing fabric. I found the seams didn’t really need it, and you can hand tack them later. If you feel it needs to lie flatter, steam and use a clapper.

Because of stretch in the dress and lining, and because the sequins are so heavy, I stay-stitched my trusty friend; clear elastic, around the neck (no stretching!). This gives it the stability to not get all wonky with weight and stretch. Instead, it will give it the stability to hold up that dress you’ve been working on for a week.

If you’re like me, now you’ll try it on and go “I feel like Zsa Zsa! I’m so glamorous! Maybe those past 13 hours have been worth it!” And for a few moments it does feel like it’s all worth it.


Time Spent sewing: 1 hour
Time spent gawking at sparkles: at least 1/2 hour.

8- Hemming
Just when you thought you were done with sequin removal, it begins again. Once you get everything the length you want it and pinned (if you haven’t already), trim off all the hem sequins and hand hem the bottom. Because it’s all mesh, it’ll look flawless from the outside!
Time Spent: 4 hours

9- Hand sewing sequins: the project that never ends
I hope you saved leftover fabric, because you’ll need it. Now is when you can take advantage of the sequins being attached by one thread and remove a bunch of whole sequins. You may have noticed when you tried your dress on that you can see all the backing fabric at your seams. Now you are going to painstakingly attach sequins over all the bare spots. I also used this opportunity to tack my seams the direction I wanted them, which keeps the seams as flat as possible.
Time Spent: 8 hours (damn those long sleeves)

But guess what, now you’re done! Only about 30 1/2 hours and 3 sewing needles later.

And that is how you make a sequin dress. I suggest buying one from some sweat shop where 5 year olds are clipping sequins off instead of making one. Just kidding! (mostly)

Oh, but you do feel so glam in it. I probably would not make a sequin dress like this again, but I do feel more prepared to take on sequin projects in the very, very, very distant future.

If you have any sequin questions or tips, you know what to do: leave a comment!

Aforementioned Sewing with Sequins articles:
By Hand London – Nerdy sewing tips: Sewing with sequin fabric
Craftsy – Tips for Sewing with Sequins
Burdastyle – Sequin Savvy
Emma One Sock – Beads and Sequins

Posted on Categories Cosplay, PropsTags , , , , , , , Leave a comment

Aquaman Preview

Sorry for the Radio silence the past week or so, I’ve been cramming on my Aquaman cosplay for HeroesCon this weekend. But y’all know how that goes.

I thought I’d give you a quick sneak peak of some of my progress:

Untitled-1


I’m not even going into all the sequins that now have littered my house. You know what’s worse that glitter? GIANT glitter. I am littering the world with gold sparkles. I’ve never sewn with safety glasses before. It’s surprisingly distracting.

I’ve recently fallen IN LOVE with Dragon Ball Z and have been cramming it in while I work. Makes me feel very weird getting into it (and I have become obsessively into it) in my 30s, but whatever. Thanks Funimation Streaming!

Ugh, I love Vegeta so much. That cocky smile? His sassy attitude? Be still my heart.
Vegeta.Ep.11.DBZKai

I tend to update instagram with progress shots as a work on things (and post pictures of my cats) so if you’re into seeing that stuff, you can find me there.

And if you’re at HeroesCon this weekend, find me and say hi!

Posted on Categories articles, Cosplay, free downloads, Series, TutorialsTags , , , , , , , 1 Comment

Cosplay Starter Kit: Planning your costume (Part 2)

CSK_pt-2

Last time I talked a bit about narrowing your costume selection down, and this time I’m going to go into the nitty gritty of planning out the costume. You can do this for all of your costumes first, and then narrow down or you can do it after. If you’re new to making costumes, you might want to do this step first because it will help you figure out all the bits and pieces for each costume and you can evaluate your time, skills, and costs early. This isn’t my first rodeo, so I have a pretty good grasp of what skills I have etc so I’m comfortable estimating that on the front end.

I’m a visual person, so I’ve created some worksheets, you can get these for free (Yes! Free!) These are pretty great because you can 3-hole punch ’em, put them in a binder and keep them for future reference if needed.


Screen Shot 2015-05-21 at 4.36.33 PM

Now for the meat and potatoes of today’s post: here’s how I plan out my costumes and use the planning sheets. My examples are digital so they are easier to read, but I do a lot of sketching by hand too.

Aquaman
I’m bookin’ it to squeeze in my Aquaman costume by HeroesCon (a mere 3 weeks away) between some swimsuit commissions and a wedding dress, so planning is crucial!

Page 1: Reference Shots
First things first, Grab all the reference pictures you can find. The internet is full of great shots (normally) but you also might need to go straight to the source material and/or sketch stuff out. I usually do both. I was lucky enough to have the artist sketch out the costume details for me (thanks, twitter!). I also grabbed different Aquaman shots for color, shapes, and specifics.
SG Costume planning worksheets_2015

Page 2: Costume sketches
The next bits aren’t too far off of industry fashion line sewing:
I start drawing out all the bits and pieces. ALL OF THEM. Don’t skimp on this stage. The drawings don’t need to be works of art, but need to be clear enough so you know what you’re doing. Draw the front, the back, accessories, shoes. Get it all out there. Not only will this help you figure out everything you need, a lot of time it helps you get your mind around how things need to be constructed, or process you might need to learn.

SG Costume planning worksheets_20152

Page 3: Costume Materials  Fabric
This is a sewing blog of sorts, and I personally hate refashioning, but if you are buying and/or altering ready to wear, you can go looking for pieces that fit what you’re looking for right now. But you might want to stay tuned to this part because it could help you find the pieces you need a little easier.

If you are not comfortable drafting your own pattern, now is the time to look for appropriate ones. You have your sketch, and all patterns have technical sketches! This is probably the coolest thing I nerd out about with patterns. It’s so easy to get distracted (or lured in) by how cool the picture looks on the envelope, but we are looking at the black and white line drawing. This shows us the bones of the pattern. I like to do this whether I use a pattern or draft my own because it also helps me estimate the yardage I’ll need of specific fabrics.

I’ll be using McCalls 7122 (view c) for the dress:

McCalls M7122


Screen Shot 2015-05-20 at 2.45.45 PM

I chose this pattern because it doesn’t have a lot of sewn in shaping like darts, and I like the raglan sleeve because it’s less easing I’ll have to do inserting the sleeve, which with sequin fabric that’s pretty pricey and not the easiest thing to work with, seems like a plus. I’ll be making some changes though, I need to raise and lengthen the neckline to make it boat shaped neckline, and take in and shorten the bottom of the skirt as well.

The leggings I’ll be self drafting because it goes over shoes, but this McCalls pattern also has a legging patten I can use if I want. Yippie! I’ll be drafting the cape because it can’t be that hard, right? (This is how I get myself in trouble.)

I then went online and grabbed some swatches, but you can glue or pin on actual fabric swatches here as well. You can order these online or check with your local fabric store, they might give them to you for free!

Now that the blueprint has been set, I can work out the costs and keep track of the fabric I need to buy. I know from the pattern envelope I need at least 2 yards of fabric, so I’m rounding up to 3 Just in case. I’m just a round up/play it on the safe side kinda gal.

Screen Shot 2015-05-20 at 2.45.54 PM

I’ve never worked with sequins to this capacity before so I want to make sure I have enough in the event of mistakes, and apparently you need extra sequins so I know I’ll be covered. The sequin fabric is somewhat stretchy, based on a power mesh backing so I’ll need a lining as well. I also learned from the internet that you should always line sequin dress because they can be scratchy. I also am utilizing some spandex from my stash for the legging and the cape that’s left over from bridesmaids dresses. I also know I’m using gold stretch pleather for the belt, so I put that down here as well.SG Costume planning worksheets_2015

Once my fabric is picked out, I can put down where to buy it (really important incase you need to order more) and the cost. Finally, I try to think of all the notions I’ll need; zippers thread, elastic, etc and put that down. I can now add up all the costs and get an estimate for how much money I’ll be spending on fabric. Yay and boo, all at the same time.

Page 4: Costume Materials — Props and Accessories
The last page! Or maybe pages, depending on your costume. I use the same process as page 3. I drew out my Trident design in illustrator so I’d have quick reference (I have it actual size elsewhere), a quick side view of the earring, and a list of the other accessories since they are pretty well laid out on the sketch. You might need to do a bit of thinking here to try and wrestle out how exactly you plan on making all your prop pieces so you accurately choose your materials.

I crammed all mine on page because there isn’t a lot of detailed pieces, but you might want several pages with deeply outlined materials and budget costs for each accessory piece.

I listed and sketched out the accessories I’ll need to the side and just added all the costs together. You can see I tried to list every darn thing I could think of that I’d need to make everything. You can put wig costs, shoe costs, plus base materials here.

SG Costume planning worksheets_20154

Then add up your costs from page 3 and page 4. Maybe scream, maybe cry, maybe get really excited because it will cost less than you think. Whatever your reaction, you’re ready to start making!

Next time I’ll be talking a bit about different kinds of fabrics for those unsure about what fabrics to choose.

*While writing this post I found a phone app called Cosplanner which you can track all your costuming planning the same way digitally. It’s pretty cool! But I like having the sheets to reference because they are bigger and I can take notes and draw on them. But I’m an old fuddy duddy that’s stuck in my analog ways.

Posted on Categories articles, Cosplay, Series, TutorialsTags , , , , , , , , 1 Comment

Cosplay Starter Kit: Planning your costume (Part 1 )

starterkit_1It’s love at first sight. You see it, you need it, you want to make and be inside that wonderful outfit. You love the character, you love everything about their costume and you’re ready to to get elbow deep in fabric, silicone, latex, Worbla whatever to make sure this beautiful vision you see becomes a reality. You stare at photos online, dreaming of what it would be like to put on those wings and show your love to the world.

It’s so easy to get excited and get lost in the process that things don’t turn out quite as you planned. Maybe the fabric isn’t right or it doesn’t fit how you wanted. You are convinced evenly distributed spray paint is a thing of myth. You’ve cried more times over something going wrong, and you have 2 days before you leave for the con, and you just cut two left sleeves out of your last bit of fabric. Or your clear coat won’t dry, or accidentally bleach half of your perfectly dyed fabric cleaning the washing machine…

I get it. I mean, I reeeallllyyy get it! Through trial and error, and working in a deadline focused industry, I’ve learned over the years how to properly plan a large project, and no project is larger than a cosplay (not true, but it feels that way).

Planning a costume is the most fun! I plan more costumes than I could manage to possibly make. It’s a process full of possibilities and excitement! And if you’re anything like me, you love finding out everything you can about the character, costumes, materials needed and reverse engineering how something might go together. But I’m no fool, It can also be really daunting if you’ve never done it before. Here at Seams Geeky we try to take as much confusion out of the process as possible. That means lots and lots of research and planning, including calendars and budget sheets.

Ok, first things first. You bought your con tickets and hotel a year in advance, and now you just need to figure out what to wear!

Figuring out what costume(s) you want to make 
Dig through your files (or pinterest boards), meditate, search your soul and determine what costume or costumes you want to make. Gather them all! Then start sorting through all of them and narrow it down.

First: Evaluate skill level.
This isn’t the end-all-be-all but you need to start with what you are comfortable with. Making a costume is great because you learn SO much each time you make something. What skills do you already posses? What skills are you confident in? What fabrics are you comfortable using?

Next: What skills do you want to learn?
Want to work with Worbla but never had before? Great! Never made a petticoat and want to learn? Fantastic! The best part of running into battle (and I consider every costume a battle) is it’s a trial by fire.

But you have to have time to learn. You’re probably not going to get it right the first time, so onto part 3:

What is your time line?
Do you have a whole year to make one costume? Do you have 2 months? Do you feel confident that you can learn what you need to in time, or will you be slapping it together at the end?

Now this one is optional: Think about your body image.
It’s a tough subject to talk about, especially with cosplay, so I want to be clear that I’m not saying throw out costumes because you’re worried you don’t have the same proportions. Screw that nonsense, wear what you want! What I’m saying is: If you think you need to lose 20 pounds before you can wear the cosplay, you should lose the 20 pounds (or be well on the way to losing it) before starting construction.

Tip sparkle rightI try to emphasize this with any custom garment I make:
A body can change a lot, by building muscle, by losing fat, so once you start making your costume, try to stay the same weight. The last thing you want is to have to take in 2 inches because now it doesn’t fit right. That’s a lot of last minute stress you don’t need.

I was talking to a client the other night about a costume, and she mentioned she wanted to lose some weight and I had to let her know that her costume would take about 2 months to make, so come July, she has to stop losing weight and stay the same size, otherwise she’ll risk the costume not fitting.

And finally, what is your most favorite that you HAVE to make right now? Because it’d be nice if the world was all puppies and rainbows and we did everything by the books, but sometimes passion completely wins out!

*Drum roll please*
My 2015 Cosplay list I put together the end of last year with a focus of getting several complete for DragonCon. Here’s why I chose each one per my narrowing parameters:

I’ve done a decent amount of comic cosplays in the past, and I was trying to diversify a bit this year. I originally wanted to do 1 Comic Character, 1 anime character, and 1 Video Game character. Cover my trifecta of geekiness. Somehow, though It ended up being very anime heavy. I don’t mind this, because anime is my FAVORITE, and it’s how the cards of fate fell.

Nova Prime

gotg-bus-shelter-nova-prime-v1-lg-3c7d7

Why is that? I NEED TO MAKE IT. The second I saw Glenn Close walk on screen in the uniform, I knew it was destiny. That’s a #5. But I also know I can accomplish it. There’s going to be some pattern drafting, a little bit of molding and casting (enough to learn from, but not too much to feel overwhelmed. And if need be, I can do some last minute foam pieces), and I have a friend who’s going to style the wig. DONE!

Meryl and Milly:
trigun_mm0013

I’m REALLY excited about this because I get to cosplay with my bestie! The outfits are mostly sewn, so that’s in my wheelhouse. Plus, we are totally Meryl and Milly. It’s going to be great. I do have some apprehensions with the guns, but if the big stun gun doesn’t get made, it won’t kill the costume and there’s some derringer Air Softs out there in a crunch.

Kuranosuke from Princess Jellyfish:
Kuragehime - 11 - Large 23

If you haven’t caught on by now: Princess Jellyfish Forever (PJF). Also, I want that dress, and it’ll be fun to make without being too stressful. And I love Kuranosuke. I also think it’s funny to be  girl dressing as a boy dressing like a girl…

I had two optionals, but they needed to get set aside for another day. But then this came along:

http://gibsoncomics.com/

That’s a combination of all things I love, genderbend, Aquaman, and a dream casting of Charlize Theron AS Aquaman. Plus, Jordan Gibson dress me the full body costume for costume reference because he’s awesome. I’ll also get to play with Worbla, which has been on my list a long time.

So I had to say goddbye to Kuranosuke. For now.

tumblr_static_cybj3308j1w8ocw4k08o0wcwc

Coming up in part 2: getting into the nitty gritty of costume specifics, plus a freebie for everyone!

What are your cosplay plans for the year? Do you have any apprenstions? I’d love to see what you plan on working on!