Posted on Categories articles, Cosplay, Fashion, The BindingTags , , , , , , , , , Leave a comment

Weekly round-up 5.15.15

Binding header

I joke I have my own little Toothless (well, 2 of them now). And by joke I mean clutch them close to my chest and cry whenever I watch How to Train Your Dragon. Now you can make your very own Toothless with this tutorial  (7 part tutorial series on Deviant Art)

I really enjoy taking ridiculous selfies with my cats. This is Midna, btw.
I really enjoy taking ridiculous selfies with my cats. This is Midna, own lil’ Toothless. She treats me like a tree.

Did you know by putting fishing line in the narrow hem of you petticoat can get you from square dancer to anime approved?

Apparently you can make your own Worbla if you have ingenuity. Here’s a video tutorial outlining how to do it. Personally buying it pre-made is worth paying the extra few bucks if for not other reason than to save my sanity (and my marriage).

This amazing set of Cigarette cards depicting possible professions for women from the the 1880s popped up in feed recently.  I want to make them all!! I’m definitely drawn towards the Amazon King, personally.

Also, Nimona is out this week. If you didn’t follow along online, I’d suggest picking it up. I got mine this week and can’t wait to read the epilogue!

Did you know the Princess Leia ceremonial gown from A New Hope had been lost for years? It was recently found and restored to the best of their ability and was displayed at Star Wars week in Anaheim. You can look at all the amazing details here. Makes me wish I wasn’t already married so I could make this for my wedding dress and make my 10-year-old self’s dreams come true.

Last but not least, I just finished watching Gargantia on the Verdurous Planet. One part Enders Game mixed with one part Waterworld, if Waterworld was a good movie. As of right now it’s on Crunchy Roll and Netflix and I recommend it!

Posted on Categories articles, Cosplay, Series, TutorialsTags , , , , , , , , 1 Comment

Cosplay Starter Kit: Planning your costume (Part 1 )

starterkit_1It’s love at first sight. You see it, you need it, you want to make and be inside that wonderful outfit. You love the character, you love everything about their costume and you’re ready to to get elbow deep in fabric, silicone, latex, Worbla whatever to make sure this beautiful vision you see becomes a reality. You stare at photos online, dreaming of what it would be like to put on those wings and show your love to the world.

It’s so easy to get excited and get lost in the process that things don’t turn out quite as you planned. Maybe the fabric isn’t right or it doesn’t fit how you wanted. You are convinced evenly distributed spray paint is a thing of myth. You’ve cried more times over something going wrong, and you have 2 days before you leave for the con, and you just cut two left sleeves out of your last bit of fabric. Or your clear coat won’t dry, or accidentally bleach half of your perfectly dyed fabric cleaning the washing machine…

I get it. I mean, I reeeallllyyy get it! Through trial and error, and working in a deadline focused industry, I’ve learned over the years how to properly plan a large project, and no project is larger than a cosplay (not true, but it feels that way).

Planning a costume is the most fun! I plan more costumes than I could manage to possibly make. It’s a process full of possibilities and excitement! And if you’re anything like me, you love finding out everything you can about the character, costumes, materials needed and reverse engineering how something might go together. But I’m no fool, It can also be really daunting if you’ve never done it before. Here at Seams Geeky we try to take as much confusion out of the process as possible. That means lots and lots of research and planning, including calendars and budget sheets.

Ok, first things first. You bought your con tickets and hotel a year in advance, and now you just need to figure out what to wear!

Figuring out what costume(s) you want to make 
Dig through your files (or pinterest boards), meditate, search your soul and determine what costume or costumes you want to make. Gather them all! Then start sorting through all of them and narrow it down.

First: Evaluate skill level.
This isn’t the end-all-be-all but you need to start with what you are comfortable with. Making a costume is great because you learn SO much each time you make something. What skills do you already posses? What skills are you confident in? What fabrics are you comfortable using?

Next: What skills do you want to learn?
Want to work with Worbla but never had before? Great! Never made a petticoat and want to learn? Fantastic! The best part of running into battle (and I consider every costume a battle) is it’s a trial by fire.

But you have to have time to learn. You’re probably not going to get it right the first time, so onto part 3:

What is your time line?
Do you have a whole year to make one costume? Do you have 2 months? Do you feel confident that you can learn what you need to in time, or will you be slapping it together at the end?

Now this one is optional: Think about your body image.
It’s a tough subject to talk about, especially with cosplay, so I want to be clear that I’m not saying throw out costumes because you’re worried you don’t have the same proportions. Screw that nonsense, wear what you want! What I’m saying is: If you think you need to lose 20 pounds before you can wear the cosplay, you should lose the 20 pounds (or be well on the way to losing it) before starting construction.

Tip sparkle rightI try to emphasize this with any custom garment I make:
A body can change a lot, by building muscle, by losing fat, so once you start making your costume, try to stay the same weight. The last thing you want is to have to take in 2 inches because now it doesn’t fit right. That’s a lot of last minute stress you don’t need.

I was talking to a client the other night about a costume, and she mentioned she wanted to lose some weight and I had to let her know that her costume would take about 2 months to make, so come July, she has to stop losing weight and stay the same size, otherwise she’ll risk the costume not fitting.

And finally, what is your most favorite that you HAVE to make right now? Because it’d be nice if the world was all puppies and rainbows and we did everything by the books, but sometimes passion completely wins out!

*Drum roll please*
My 2015 Cosplay list I put together the end of last year with a focus of getting several complete for DragonCon. Here’s why I chose each one per my narrowing parameters:

I’ve done a decent amount of comic cosplays in the past, and I was trying to diversify a bit this year. I originally wanted to do 1 Comic Character, 1 anime character, and 1 Video Game character. Cover my trifecta of geekiness. Somehow, though It ended up being very anime heavy. I don’t mind this, because anime is my FAVORITE, and it’s how the cards of fate fell.

Nova Prime

gotg-bus-shelter-nova-prime-v1-lg-3c7d7

Why is that? I NEED TO MAKE IT. The second I saw Glenn Close walk on screen in the uniform, I knew it was destiny. That’s a #5. But I also know I can accomplish it. There’s going to be some pattern drafting, a little bit of molding and casting (enough to learn from, but not too much to feel overwhelmed. And if need be, I can do some last minute foam pieces), and I have a friend who’s going to style the wig. DONE!

Meryl and Milly:
trigun_mm0013

I’m REALLY excited about this because I get to cosplay with my bestie! The outfits are mostly sewn, so that’s in my wheelhouse. Plus, we are totally Meryl and Milly. It’s going to be great. I do have some apprehensions with the guns, but if the big stun gun doesn’t get made, it won’t kill the costume and there’s some derringer Air Softs out there in a crunch.

Kuranosuke from Princess Jellyfish:
Kuragehime - 11 - Large 23

If you haven’t caught on by now: Princess Jellyfish Forever (PJF). Also, I want that dress, and it’ll be fun to make without being too stressful. And I love Kuranosuke. I also think it’s funny to be  girl dressing as a boy dressing like a girl…

I had two optionals, but they needed to get set aside for another day. But then this came along:

http://gibsoncomics.com/

That’s a combination of all things I love, genderbend, Aquaman, and a dream casting of Charlize Theron AS Aquaman. Plus, Jordan Gibson dress me the full body costume for costume reference because he’s awesome. I’ll also get to play with Worbla, which has been on my list a long time.

So I had to say goddbye to Kuranosuke. For now.

tumblr_static_cybj3308j1w8ocw4k08o0wcwc

Coming up in part 2: getting into the nitty gritty of costume specifics, plus a freebie for everyone!

What are your cosplay plans for the year? Do you have any apprenstions? I’d love to see what you plan on working on!


Posted on Categories articles, Cosplay, FashionTags , , , , , , Leave a comment

The Power of Practice

Screen Shot 2015-05-08 at 10.30.07 AM


Oh man, just the idea of practicing things gives me cold sweats. I remember as a kid taking piano lessons and procrastinating on practicing and then I’d go into my next lesson embarrassed because I still sucked at playing Frère Jacques. I think there’s two parts to that equation: 1) I had no desire to play Frère Jacques (rock and roll, please) and 2) practicing is scary because you screw up. A lot. And that can take a toll on your self esteem.

I mean, this is true of everything we have to practice. It’s not like I understood the quadratic equation the first time I tried it, but because my homework sheet had 20 problems I had to answer using it, I
eventually figured it out. But when it comes to hobbies or extracurriculars, it’s up to us to tell ourselves its something we want to learn. And that’s hard. For one thing, it’s really sucks not understanding it the first time. I think we all have grand dreams of being perfect the first time around. We are just SO awesome, and that can’t be THAT hard. We’re bound to be prodigies. And for some people, they are. And for the rest of us, well we have to work for it. Which means you have to motivate yourself to get there. And we can all get there with one simple attribute:

Blind stubbornness.

Seriously.

You have to pump yourself up, play “Eye of the Tiger” or “Don’t Stop Believing,” or “I Believe I Can Fly.” Whatever your poison (Hey, if “Talk Dirty to Me” is your thing, go for it!). If you need to pin up a piece of paper entering your crafting space and jump through it, do it! I do this:

giphy
And then you tackle your project. And screw up, rip it out, re-cut it, re-glue it, and probably cry a few time along the way. But you can’t give up, because you are gonna own it (literally and figuratively) when you’re done!

You all know I’m a huge fan of sewing. It’s my favorite. I’m comfortable with it, I’ve been doing it for years, and I’m always trying to get better by trying new things. Once you learn the basics, you have to try new things. It gets really boring if you don’t.

My one word of advice here, take baby steps. Don’t try and make a ball gown your first time out if you haven’t sewn before.

That nonsense is tricky. There’s usually a lot of technique that goes into a fancy gown. I mean you can do it, but it’s real easy to get frustrated and drop everything. Lots of tears, anger, “I sucks” and a crushed crafting self esteem. And that’s no fun. This stuff should be fun!


Tip sparkle leftNow in respect to cosplay, man, we are swimming in some uncharted waters (unless you went to school for it). So I’m gonna drop some SeamsGeeky™ Wisdom on you: practice on something smaller first.


Shocking, I know. But that’s a hard pill to swallow sometimes. I mean, we want that sweet, sweet movie accurate Black Widow catsuit NOW! But from experience, cosplay isn’t cheap and the last thing you want to mess something up half way with your $25 (or more!) a yard fabric because you jumped into the deep end before you knew how to kick.

Sewing breaks down into levels of techniques and skills which add up to the knowledge of making something. You kinda have to build up your own mental toolbox before taking on something crazy.

• Sewing a straight seam
• Knowing what are the best tools for the job
• Understanding how patterns look and how they go together
• Pattern alterations
• Understanding textiles and textile best practices
• Fabric grain
• When to machine stitch, when to hand stitch
• The right interfacing for the job
• Fit (this is the hardest, I think)
• Tailoring
• Draping

I could go on for days. And there is, like, a billion variations on themes. It seems overwhelming, I know.

tumblr_n1ngdvRubP1skqnkyo1_r1_500

So when I want to learn something, I break down what exactly I want to learn. I HATE learning with “samples.” I don’t want to insert a zipper into a square of fabric, I want something usable at the end, not just a zipper randomly floating around my sewing room. I don’t have the time or space for that. So I figure out a project where I can use a new skill and try it hands-on then complete that project. And I try not to make it too hard on myself.

Need to learn how to put in a zipper? Sew up a simple, unlined skirt (from a  sewing pattern. Online sewing tutorials when your learning can suck, and having an instruction sheet really helps) out of a basic cotton. Seriously. You get something usable you can be proud of (Self Esteem Booster!) And you’ll have learned how to put in a zipper, and gotten better at cutting out patterns, understanding pattern shapes, sewing a straight seam, seam finishing, probably interfacing, hemming, and most importantly, putting in that zipper. (the cotton helps you hide those holes if you have to rip it out and redo it).

Rinse. Repeat. You’re going to get better and better every time. I had an art teacher who told me, “Draw it 3 times, and you’ll be amazed how much better the last one looks. Then do it 3 more.” But drawing an apple 6 times is boring. 3 skirts and 3 dresses to add to my closet? Plus with all the amazing licensed fabric there is now, you can fill out your geek wardrobe and have much more fun.

Screen Shot 2015-05-08 at 10.14.33 AM
Anytime I try something new, I try to do it in a small scale on a wearable project first. And I’m probably going to repeat this over and over. In every post. From here to eternity. The main reason I like doing things this way is because it boosts your self esteem, which is hard to keep up sometimes. That way when you’re ready tackle that costume, you feel armed with the skills to figure it out! Scared to work with spandex? Make some leggings or a swimsuit. Unsure of leather? Make a bag, or add some leather accents to a jacket. When you spend 3 months on a costume, you want to be proud of it, so you need that firm foundation. I mean, every costume is it’s own adventure, and it can feel like you are running full steam in one direction, and hoping that it’s the right way.

We are all students in the classroom of life (<——cheesy, but I don’t care). And new things always seem scary, but you have to face it sometimes. You might need to amp yourself to start, but you don’t have to run if you just learned to crawl.

You totally have this under control. You got this! You can do anything!

And I’ll collectively help as much as I can!

Posted on Categories TutorialsTags , , , , , Leave a comment

Fabric stashes—a cautionary tale

The Benefits and Pitfalls of a Sewing Stockpile

When you first start sewing, the whole world of clothing… changes.

Shopping for clothes isn’t as fun anymore. Because you look at
something and go “Pshhh! I could make that.” And you could! It might
take some research and skill, but you could make that, and it would
fit better, you’d love it more, and it won’t cost as much!

(Side note: Most of those are lies. Sewing for yourself can get<
expensive quickly. Yes, you can save money, but only if you compare
yourself to designer or high end clothes. I stopped thinking about
sewing as saving money a long time ago, instead I think about it as
“I’d rather pay more for something that fits.” And sometimes I
don’t love it more. Sometimes I wear it once then donate it.)

Thoughts of a wardrobe or cute clothes in cat prints and chevrons
float across your mind’s eye. “YES! THIS IS EVERYTHING!” So you go to
the fabric store, and browse for the perfect fabric (which I guarantee
isn’t there). You might not find the perfect fabric for what you
wanted, but Novelty prints are 30% off, and that X-Wing print is
calling your name! You HAVE to buy it! You NEEEEEED IT! More than you
needed anything in the entire world (please picture 23 year old Laurel
at the fabric store stopping herself from a toddler size meltdown over
Star Wars fabric before realizing “I’m an adult, I can buy whatever I
want.”) Oh, and this star fabric will make a perfect skirt, and I
think I need dress pants for work…. and Simplicity patters are 5 for $10.
Before you know it, you’ve spent $250 on a bunch of fabric, notions, thread, and patterns. You get home, and are SUPER excited about everything you’re going to make RIGHT NOW! You’ve seen Project Runway, you know that a ballgown can be made in 8 hours,
and you’re just making a few dresses and skirts, you’ll get all this
done tonight if you don’t sleep!

Then your best friend calls and asks if you want to go out to
dinner, so you leave the bag untouched on your floor for another day.
You forget about it. Maybe you even add a few more.

Yeah, pretty much something like this.

Then one day while playing video games you go, “Huh. Didn’t I buy some
Star Wars fabric?” You realize you’ve accumulated this huge
backlog of projects, some of which you don’t even want to make
anymore. Did you really buy “Peace and Love” flannel? *face palm*

Stashes are the most wonderful thing in the world to accumulate, then the worst thing to have.

Well not the worst, but it can get a bit daunting, and most of it
isn’t needed. (Well, that’s not true either… I’m a bit of a stash
addict, still in denial) there are certain things you want to have on
hand at all times.  If I had a Sewing and Crafting fairy when I first
started, the first thing she’d say is “Don’t buy something unless you
have a project for it.” But that’s no fun.

When I go to fabric shopping now, I bring a list of what I’m looking for, the
yardage I need, notions, what to get if on sale, etc. I also find I am
more likely to plan projects now because space is limited, and I’m
more focused on what I make and do.

Tip sparkle leftCosplay tip: If you have several projects planned out for sometime in the future, keep a list of fabrics and notions you need on hand at all times because when you want blue pleather Murphy’s Law says you won’t be able just the right one. You never know when you might find just what you need.

So without any more rambling on and on…here is what I stash away for a rainy day:

Basically try to keep on hand any notion you will completely forget to buy

  • Elastics
    varying sizes and colors and types
  • Buttons
    A lot of time I buy buttons specifically for projects but I also capitalize of good deals, like those bags of assorted shirt buttons and throw them all in my button bucket.
  • Various other closures
    sew on, snaps, hook and eyes, grommets
  • Velcro
    I usually but 1 inch wide in white and black. You can dye
    white velcro really easily to match projects. See more about dying
    here. You can cut it thinner if you want. I personally like this snag
    free the best.
  • Zippers
    I like to have a variety of zippers in various colors, lengths, and types. Invisible being my favorite, but both kinds are handy, and I always opt for longer vs shorter because shortening zippers is easy
  • Interfacing
    Various kinds, fusible, sew-in, black, white, woven, non-woven) and recently I’ve started using fusible interfacing on a roll for small area like neck bands, button plackets, or inserting zippers. You can get bias cut (sometimes called wigan) or on-grain straight cut
  • Muslin
    I buy this by the bolt, but just having a few yards on hand can be a life saver
  • Sewing machine needles
    In various sizes and for various tasks (stretch, microtex heavyweight, twin, topstitching, etc.)
  • Thread
    I always keep white, black, and light grey. I like to buy these in big spools so I have lots on hand)
  • Fabric basics in basic colors
    White cotton jersey, spandex, lining fabric, broadcloth and voile or batiste, a few satins, denim and twills to name a few. Whatever you sew with the most, have some basic colors on hand
  • Fun miscellaneous trims
    Stretch lace, normal lace, bias binding, piping, rick rack, ribbon, etc for when your project just needs a little something special
  • Dye (optional)
    You may have figured by now I do I decent amount of dying, so I have a large tupperware stored away with different dyes in a variety of colors
  • Any materials needed for niche items (optional)
    For example, I love sewing corsets so I like to keep steel boning, grommet, coutil, and laces on hand so I don’t have to wait for an order to come in. Some items are hard to get, or you get a better price for buying in a larger quantity so it’s nice to have a little stockpile for last minute projects.

I never feel guilty about having a bunch of this stuff stocked away. The fun prints and stuff? Those are things I try to buy on an “as-need” (and as I mentioned above, sometimes you NEEEEED things for no rational reason) basis.

How big is your stash? Do you find it valuable? What kind of things do
you stash away?

header photo credit: Buzzfarmers via flickr (creative commons license)
Posted on Categories UncategorizedTags , , , , , , , , , , , Leave a comment

Weekly round-up

Binding header

Guys, I’m not gonna lie: I’m really obsessed with Kimonos right now, so I’ll try to keep this roundup as Kimono-light as possible. Luckily, the husband and I saw the new Avengers: Age of Ultron last night, so it won’t be all Kimono all the time.

I know the pictures have been out awhile, but seriously, how great is that Ombré jacket Wanda wears?

Screen Shot 2015-05-01 at 10.10.07 AM

I’ve been spending a decent amount time trying to find Ombré leather dying tutorials online, and coming up with nada, but here’s a basic leather dying tutorial to get you started on experimenting. Thanks e-how! I’m pretty sure the rusty nail or the tea option is the best way to get an even ombré.

tumblr_nf2gn95F2y1qklq7jo1_500

Just love the Ombré look but not comfortable working with leather? Why not ombré a cotton twill then wax it? Costume designer Alexandra Byrne (my personal costuming hero and costume designer for a good share of the Marvel movies including Age of Ultron) has used a variety ways giving wovens unique finishes to emulate and pair with leather.

How to Ombré dip dye

Otter Wax tutorial video

I’ve done a lot (and I mean A LOT) of research concerning kimonos in a very short period of time. Did you know most Kimono silk is still hand painted? And you have to apprentice for a minimum of 7 years! It’s a process called Yuzen, and it’s really impressive to watch.

I’ve been watching Death Parade (stupid name, really interesting anime). The opening song is so much fun and is done by a band named Bradio. Here’s it is to jump start your weekend! Have a great one!

Posted on Categories UncategorizedLeave a comment

To new beginnings

Seams Geeky, when I set up this blog years ago was just going to be
another sewing blog with a strong emphasis on cosplay, a new found
passion of mine at the time. But let’s just say I’m taking cosplay to
another level in my life, and want to bring you along on the journey.
Hopefully, this means being a little more active on here.

I spent a lot of 2014 skill developing. I realized in 2013 that
sewing, and cosplay specifically, is something I love more than just a
hobby, I have a strong passion for it. Making things, wearing things,
and learning all the while. And I want to share some of my learning
with you. The cosplay/costuming community is such a cool place because
for the most part we are just kind of feeling our way along and making
things work, even though it might feel like we don’t know what the
heck we’re doing. But we make amazing things, and keep pushing
boundaries, which is so exciting and exhilarating!

So what’s new for Seams Geeky? A lot. Expect some pretty exciting
things moving forward!

To start with, besides my random meaning thoughts, and projects I’m
working on, I’ll be posting a lot more and developing some tutorials
and tutorial videos so we can all grow together!

tumblr_mf4wpqt73X1r7ctb2o1_500
Thanks for being a part of it! I’m really excited to share it with you!

Posted on Categories Fashion, TutorialsTags , , , , , , , 2 Comments

When all else fails, buy white (A fabric dying tutorial)

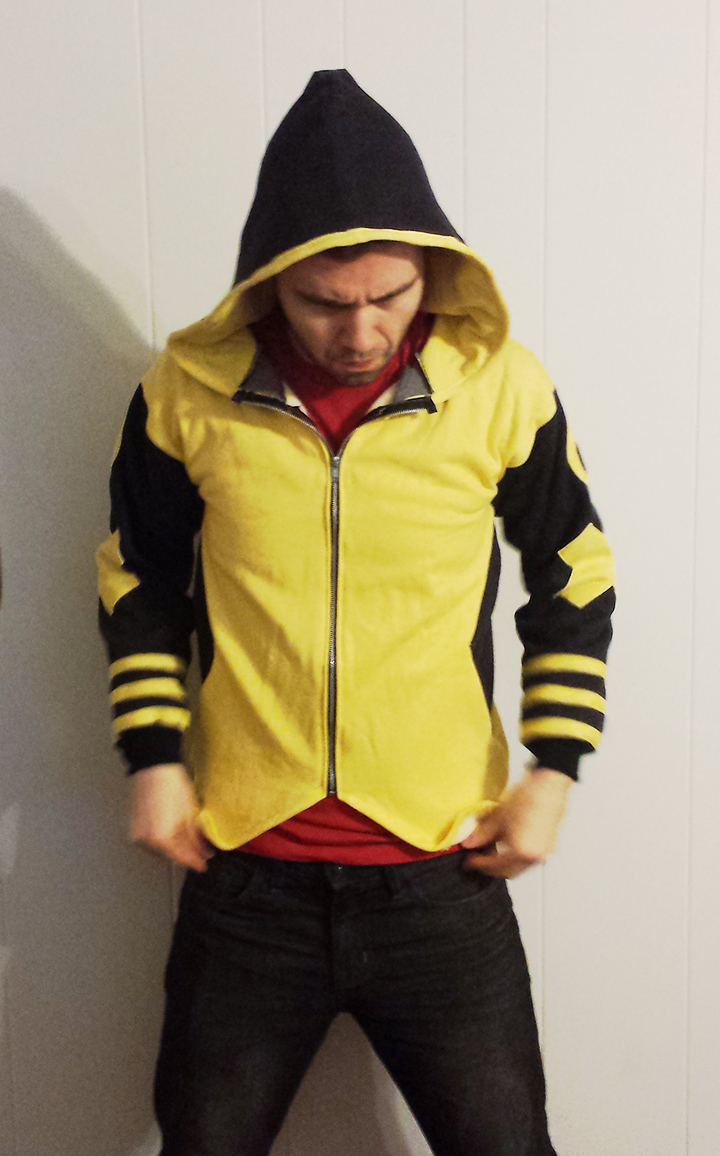
Sometimes you’re working on a sewing project (in this case, a Captain America jacket) and you can’t find the perfect fabric in the color you need. I went through this before with my original Captain America costume, and after doing my due diligence of searching, I resorted to dying my own fabric.

Now, dying fabric is one of those things where I always think “Piece of cake! I’ll just dye it” until I get into it and realize “Wow, this is a time suck.” And with my picky nature, always get wrapped up in that whole “But the color isn’t PERFECT! I must dye it again!” You may know the pitfalls already; uneven dying, dye freckles, bleeding color to name a few.

A note about fabrics you can dye:
Always know what’s in your fabric! Different textiles have different dyes (or dying processes). Natural based textiles dye the best (linen, cotton, silk, rayon, hemp, etc), but you can also dye most Nylons with great success. Today I’m going to show you how how to dye cotton fabric.

Not all cottons are created equal, and keep in mind, the base color will affect the final color. I opt for white for the purest tones, but not all white are the same. For the most vibrant dye colors, you need to start with an untreated cotton specially for dying. But not all fabrics are easy to find this way. I am using a cotton knit pique fabric because the texture most closely matches Captain America’s fabric from the Avengers. But I couldn’t find a dye-ready version, so I went with white and hoped for the best. Most fabrics you buy that are white are treated with whitening agents that could affect the final color, so it might not be as bright as you’d expect.

Dying fabric at home is a bit of bad science. You can’t always predict the outcomes. I tend to opt for a lighter color and re-dye darker since it’s much harder to get darker dye lighter. I’ve re-dyed fabric several times over until I get a shade I’m happy with.

Note: They make a special dye for Polyester fabrics, but I have yet to try it.

Now on to the tutorial:
I am tub dying. This can be done in a washing machine, but we have a front load HE washer, and I haven’t had the best results with it.

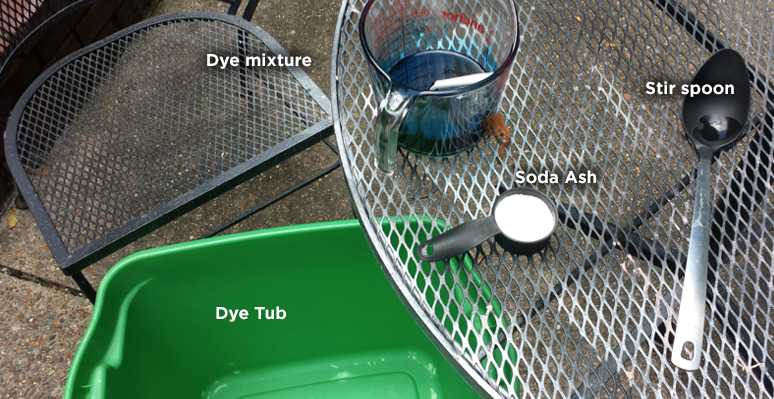
Gather all your materials together:
• Your fabric (pre-washed, please. This removes as many added chemicals, pre-treaters, and grease that might affect the dying process. Plus, it’ll help keep shrinkage down)
• Dye (For this blue, I am using a mix of Royal Blue and Cerulean Blue.)
• Soda Ash (this is a fixative for the dye)
• Urea (helps the dye to dissolve completely and reduce freckling on the final fabric. It also can help achieve a more saturated color.)
• Salt
• glass measuring cup
• dry-measuring cups and spoons
• Plastic spoons
• large pot for heating water
• a thermometer (optional)
• Rubber gloves (go with tall dish gloves to minimize hand stain)
• a trusty bucket*
• a plastic basin/tub

*Everyone should have a trusty bucket. I, sadly, could not find mine, so I used a clean trashcan.

First, weigh out your fabric on a household scale. Notate how heavy the fabric is so you know how much dye and water to use. My fabric was 14 oz, so I am going to round up and say it’s 1 pound of fabric.

Next, a little fabric foreplay. Fill up your bucket with hot water and submerge your fabric in it. Fabric should soak in hot water for 20-30 minutes (just enough time to gather all the materials you need).This opens up the fibers to get it ready to accept for the dye. I placed this outside in the sun along with my empty dying tub.

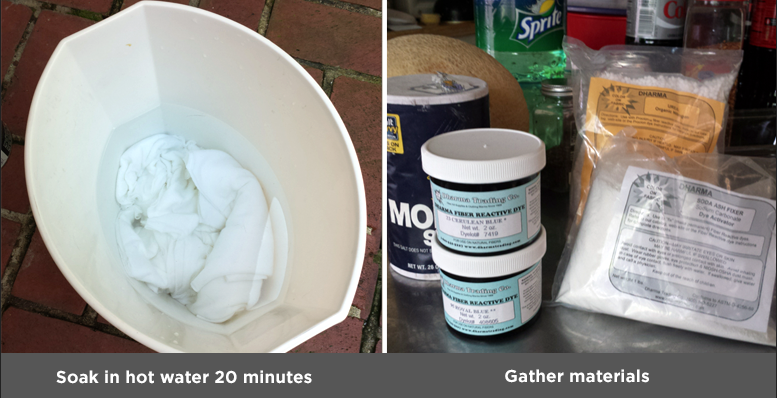
Now, gather all your ingredients into one place. Today I’m using Fiber Reactive Procion Dyes from Dharma Trading. I have used Rit dyes with success in the past, but found it took a lot more work to get a vibrant color, and freckling is a bigger issue.

Rit dye sidetone: If using Rit dyes, I find they work better with consistent almost boiling heat.

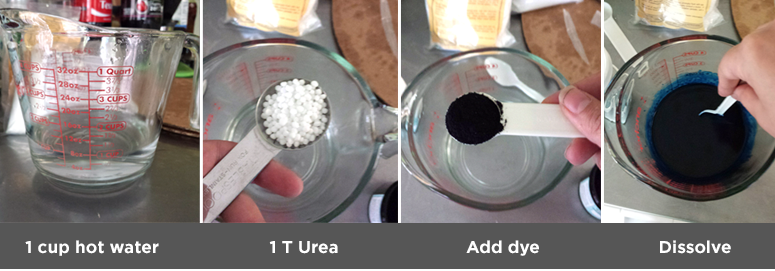
In your glass measuring cup, measure out 1 cup of hot water and mix in 1 Tablespoon of Urea (always makes me giggle). Once that’s dissolved, add in the appropriate amount of dye for your weight. There are charts with specific amounts of dye to use for different colors, but for this, it’s fine to use the approximation method which is 1 Tablespoon of dye for 1 lb pound of fabric. I used 2 tsp Royal and 1 tsp Cerulean to make up 1 tablespoon. For a darker color, you can use more dye. Stir this up until all the dye is dissolved in the measuring cup, then move it outside with your fabric and dye tub.

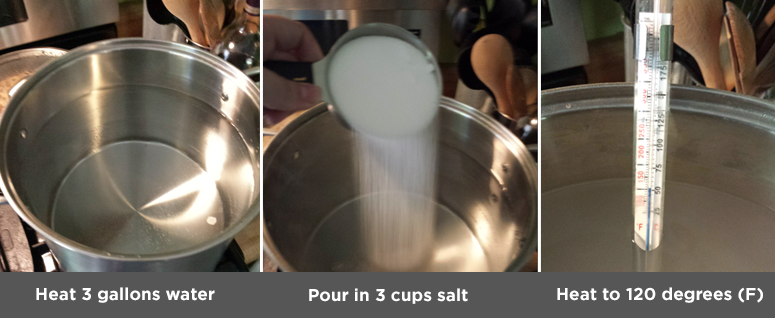
Fill up your large pot with 3 gallons of water and start warming it up. The best temperature for dying is 105 degrees F so we’ll want the water around 120 degrees to account for cool down when we move it from the heat. Next, add 3 cups (yup!) of salt to your water heating up on the stove. I use the cheapest table salt I can find at the store. You want to make sure it dissolves completely in the water.

Now, measure out 1/3 cup of Soda Ash. You can dissolve this in 1 cup of water now, but since I only have 1 glass measuring cup, I just take the soda ash out as is.


Take all your remaining supplies outside, put on those lovely gloves and dedicate the next hour to dying your fabric.

First, pour your salt water into your dying tub.

Then adding your concentrated dye. I swish the measuring cup around to get as much dye as possible into the water. Then stir until it a consistent color. You can check the temperature now and make sure it’s still above 100 degrees but below 120. It should feel about the same temperature of a hot tub.

Now that I have an empty measuring Cup, I add in my soda ash, and pour some of the water my fabric has been sitting in, and stir it around to dissolve. You’ll need this later.


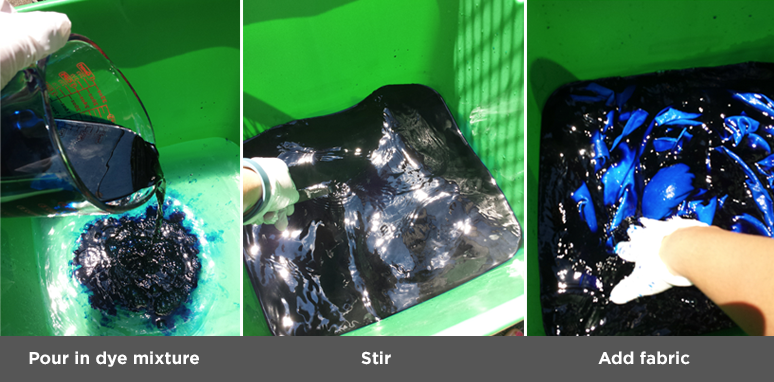
No turning back now, add in all your fabric! You can use solid yardage, but I’ve found I get a better, more consistent dye, when I cut out all the fabric ahead of time. Because I have pre-washed the fabric, I know it won’t shrink anymore. But either way, when you add the fabric, make sure all of it is separated and isn’t sticking together.

For the next 20 minutes you are a human washing machine. Stir that fabric and keep it moving. You want to agitate the fabric and try to keep dye from getting trapped and sitting in the crevasses of the fabric. Unless you want a mottled look to your fabric… then let it sit and stew. I like to use my hands, but you can use a large spoon, stick, whatever. If you want it darker, you can leave it for longer, but most of the time I find maximum color saturation happens in around 20-30 minutes. If you want a darker color, you’ll have to dye again, with either a darker color or a higher dye concentration.


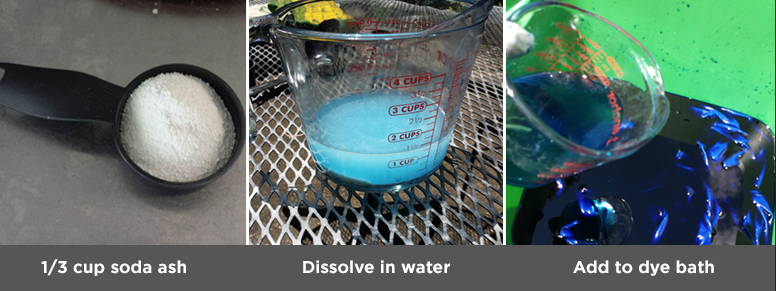
After 20 minutes, add the soda ash solution. Do not just dump this in! you want to add it slowly, bit by bit offer the next 15 minutes. Slosh all your fabric over to one side of the tub, and add a little to the dye bath being as careful as possible not to pour directly on the fabric (this will add dark splotches), then slosh around, add a little soda ash… over and over until all has been incorporated. Continuing stirring until the 15 minutes are up.


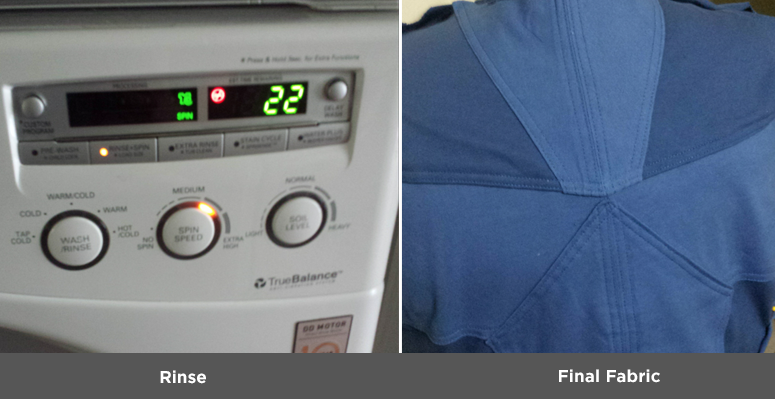
Whew! The hard part is over. Now, pull out all the fabric and place is your trusty bucket. Take it to a sink and rinse until the water is clear, or throw it in your washing machine and put it through a few rinse cycles. I then like to do a full wash cycle on delicate with soap to get out as much extra dye as possible. Once your fabric is dry, take a look at the color. You now have beautifully dyed fabric!

Now, getting rid of the dye water: Do not just pour this out on your lawn, it will kill anything growing. Ask me how I know. Find a safe place to dispose of your water. Remember there is salt and chemicals in it.

Go forth! And good luck!

Posted on Categories Cosplay, FashionLeave a comment

Memphis Fashion Week 2014

Late last year I submitted designs to the Memphis Fashion Week Emerging Designer showcase, and got accepted! Riding my costuming high from DragonCon, and filling the gap in my life from costume down time, I created a collection based heavily on more “geek” centered themes. I really wanted to show that nerd-culture inspiration can still be fashionable and innovative without being redundant.

Here’s my submission:
Designer statement:
This collection is inspired by the strong women in video games and comic books. However, rather than create cat suits and body-baring clothes, I wanted the collection to project confidence and strength – to empower while being easy to wear. Working with the Spring, 2014 palette, I chose colors that reflect another world, inspired by the colors of nebulas and the “Twilight Realm” from Legend of Zelda: Twilight Princess video game. The results are strong, sassy, and smart. I plan to use fabrics that can easily be worn and cared for. I plan to use Supplex (a sportswear fabric with some body) along with twill (both stretch and non stretch), and knits. The pieces will also incorporate mesh fabrics. I will keep my collection fresh and modern through interesting piecework and lines, mixing newer technology fabric with more traditional materials.

Mood board
Seams Geeky collection Moodboard

Sketches
Seams Geeky Collection sketches

I unified the collection by using black mesh on each look, and spent a lot of time playing with dyes and hand stitching linings.

In March, my styles went down the catwalk. I may not have won, but I did find that melding the worlds of High Fashion and geek culture (sans copyright infringement) was a very real possibility.

Posted on Categories Props, TutorialsTags , , , , Leave a comment

Working with Bondo

I’m getting ready to start learning how to do some prop fabrication, and since today is payday, I’m filling out my Amazon cart A little Apoxie scuplt, a little Bondo…).

For those new to working with Bondo (like myself) I found some handy videos on the 3M website, and thought I’d share with you all.


Posted on Categories Commissions11 Comments

New X-Men Hoodie Kinda-Commission

20130924_213809

I call this a Kinda-Commission because a friend of mine (The oh-so-talented Chris Haley) was wanting a hoodie similar to Cyclops’ jacket in New X-Men.


We’d talked about design, color, functionality changes that occur when you are essentially taking a leather biker-jacket and combining it with a letterman jacket and turning it into a different kind of jacket, in a different material. We’d priced out the cost, and then I realize that Chris’ birthday is coming up, and I could surprise him with the hoodie. The challenge being I didn’t have his measurements and had to go about guessing his size (a wonderful thank you to his lovely girlfriend, and an old Mister Miracle t-shirt he gave me two years ago).

20130924_213749

Hoodies are longer than a jacket and Chris also has a longer torso so alterations needed to me made. And with making a jacket-of-sorts longer, you also need to redraft the “X” to have proportionate angles. I did quite a bit of research for this, pulling out my husband’s New X-Men books to try to figure out all the angles on the jacket to make sure I got what I could correct.

Side note: I’ve boycotted X-Men and specifically this series because of my unnatural attachment and devotion to Jean Grey. While researching this stuff I caught a few panels and cried like crazy. Afterwards I asked my husband if I should break down and read it. He responded with “It’s such a good series, but no. It wouldn’t good for you emotionally.”

Well, went I went to one of local chain fabric stores they didn’t exactly have the colors I needed (they didn’t have black. But they did have dark grey), so RIT dye to the rescue! I started out with a dark grey and a white fabric, pre-shrunk in the washer.

20130924_213822

I learned a lot while dying my fabric for my Captain America costume, one major point being if you want vibrant colors, it doesn’t matter how much dye you put in, you need very hot water to keep the fabric fibers open. I now achieve this with constant heat and a large 3 gallon pot on the stove. This has other limitations, like not being as large I need. For this, I cut the pieces out first, then dyed them individually. I find I can get a more consistent dye on the pieces than dying a large piece of fabric, and I don’t stain my washing machine. (I’m hoping in the future my husband and I can figure out a way to get me my own personal washing machine just for dying, but until then I make do).

20130924_213753
The X-Men school logo patches I made the good ol fashioned “Freezer paper” method. I still owe him an “x” zipper pull, since the one I sculpted split in half when trying to insert the jump ring. I was so afraid it wouldn’t fit, but it does. Pretty perfectly. Lookin’ sharp, Chris.

If he asks nicely, I might try to make him a Cyclops visor to go with it.